The Connector Platform 2.31.0
Index Data
June 2015
Introduction
The Connector Platform is a set of tools for building and running database connectors: gateways that scrape human-facing web-sites and make the results available for searching and retrieval via standard IR protocols such as the much-loved ANSI/NISO Z39.50 and its more web-friendly progeny SRU and SRW.
This is a useful thing to do for lots of reasons, but we had a specific motivation for constructing this platform: we build metasearching solutions (see MasterKey, using as the metasearching kernel our own UI-independent engine Pazpar2. Pazpar2 uses the standard protocols for searching backends: by design, the engine itself knows about a bare minimum number of ways to do searching, because the focus of that particular software component is not on communications but on very fast, highly parallel searching, merging, deduplication and sorting.
So in order for Pazpar2, and therefore Masterkey, to be able to search the widest possible selection of resources, we need a way to make connectors to those resources that will present them in a form that Pazpar2 can search. Because the connectors provide standards-compliant interfaces, they are also useful in other contexts: among other possibilities, they can be used by other vendors' metasearch solutions.
Architecture
The model for connectors was thrashed out in a series on informal meetings in Montreal, and so has come to be referred to as the Montreal Model. It's a purely conceptual model, quite independent of how connectors happen to be stored and transmitted: it's about what kind of thing they are, not how they're represented. (But don't worry, there is also a concrete representation, which we'll show you at the end of this page.)
The model makes a clear distinction between three concepts: Connectors, Tasks and Steps.
Connector
A connector is a complete, self-contained specification for how to use a web-site for searching and retrieval. There is nothing about a connector that ties is particularly to the Z39.50 or SRU protocols: it described only the interaction with the back end, leaving it to other software to control how it is invoked.
A connector contains three things:
Metadata: a set of key=value pairs which contain information about the connector: for example, its title, author and date. These are not needed when running the connector, but are important for administering them, especially within the Repository.
Properties: a separate set of key=value pairs that are distinguished from the metadata in two ways. First, they influence the running connector; and second, their values may be arbitrarily complex structures, whereas those of metadata are always simple strings. For example, while the
block_cssproperty is a boolean, and can take only the valuestrueandfalse, thewhitelistproperty has as its value a list of Internet domains.Tasks. The meat of a connector is the set of tasks that it provides, which together provide its functionality. They are discussed in more detail in the next section.
Task
When a user searches on a web-site, or an application such as a metasearch engine searches on a user's behalf, the whole search-and-retrieve process typically consists of several separate tasks.
Tasks come in four types, described in more detail below (init, search, parse and next), but a connector need not have exactly one of each. Many connectors -- such as those for publicly available sites like Google and Wikipedia -- will not need an init task at all; and some connectors will provide multiple instances of the search task. For example, if a simple keyword search is submitted, then a search task that expects to use only the keyword argument will be invoked; but if author and title are specific as separate parts of a query, then a search task that uses the author and title arguments will be invoked instead, if one exists. Such a task would probably use the back-end web site's Advanced Search page.
init
Some web-sites require a user to authenticate before being allowed to search. For these, a separate initialization step is required before the searches are submitted. Higher-level logic, such as the Z39.50/SRU-to-CFEngine gateway, must determines whether or not this task needs to be invoked at the start of each session, using application-level criteria: for example, a Z39.50 session might cause a connector's init task to be run if authentication information is included in the Z39.50 InitRequest.
init tasks typically navigate to a login page, copy task parameters such as username and password into appropriate fields on that page, and submit the form. This generally results in the server issuing a cookie which allows access to the main site.
search
Every connector needs one or more search tasks. Their job is to load the web-site's appropriate search page (which may be either a Basic or Advanced Search page depending on which arguments are provided), fill in the form, submit it, and extract a hit-count from the result page.
parse
The purpose of the parse task is to recognize the parts of a result page that contain records, and extract field from them: author, title, date, etc. -- whatever is available. In general, this is the most complex part of a connector.
The two main approaches that the Connector Platform supports are parsing by regular expression matching on the HTML, or using XPattern, an XPath-like language that matches sequences of elements in the DOM tree. Helpers exist for constructing XPatterns automatically, and this is the preferred approach for sites whose HTML is sufficiently well structured to support it.
In general, the data extracted by the parsers requires post-processing to make it usable: for example, extraneous text often needs to be stripped out of field, whitespace needs trimming, dates need normalizing, URLs need to be made to work from outside the originating site, etc. The Platform provides facilities for these kinds of transformations, as well as a general-purpose regular-expression transformer. These are described in detail in the reference portion of this manual.
next
Most web-sites do not present all the results of a search on a single page. This would obviously be prohibitive in cases where many results are found -- for example, at the time of writing Google has 575,000,000 hits for the search "water". Accordingly, connectors must provide a next task which can navigate from one page of results to the next: the higher-level code that runs the connector will invoke this task, alternating with the parse task, as many times as necessary to fetch the number of records required by the application.
In general, then, the sequence of task invocations in a session is as follows:
- init
- search 1
- parse 1
- next 1, parse 2
- next 2, parse 3
- [more next/parse pairs as needed]
- search 2
- parse 1
- next 1, parse 2
- next 2, parse 3
- [etc.]
- [more searches as needed]
- [parse and next/parse pairs as needed after each search]
Each task consists of three things: a sequence of steps, a set of named test arguments, and optionally a group of tests. These are now described in more detail.
Tasks contain steps
Most fundamentally, a task consists of a sequence of steps, which are run in order, and which together fulfill the task. In general the steps are run in order from first to last, but there are a few ways in which that order can be tweaked:
Each step in a task can be marked as a an Alt step; this means that it gets run if and only if the step immediately before it failed - for example, if a step that tries to extract the value of a particular part of a results page can't do so because its XPath doesn't match anything in the document. Usually, such failures cause the whole task to fail, but alt steps provide a recovery mechanism for such situations. A common use is setting the hit-count to zero in a
searchtask when the part of the document that's supposed to say "Showing hits 1-10 of 3,456" is not present.Because connectors are working with web-sites, and because web-sites are complex things sitting on the other side of a global network, some operations don't always work they way they should. Occasionally a step will fail for transitory reasons -- for example, a result page appears to have loaded when in fact it is not complete, but will be in a few more seconds. To cope with situations like this, the Platform provides a Retry step, which can be placed after a step that might fail. It specifies how many times to retry the failed operation before giving up, and how long to wait between tries.
While alt steps and the Retry step are both ways to recover from errors, the Next If step provides rudimentary control flow based on the values of arguments. Unlike Retry, it appears before the step it controls, and says to run that step only if a condition is satisfied: that a particular argument matches a specified value.
See the reference manual for more on the Retry and Next If steps.
Tasks contain test arguments
While developing a connector, it's often useful to run either a whole task, or one of the task's steps in isolation. The behavior of the tasks and steps in a running connector depends on the arguments that are submitted with the service request (e.g. the database name and the various parts of the query, for a search request). To emulate this when testing tasks and steps within the builder, some values are needed for these arguments. For this reason, test arguments can be specified, and are saved as part of the task.
Note that the values of these arguments do not affect the behavior of the connector when providing a service by running under the Engine. At that time, the test arguments that were provided for the benefit of the builder are ignored, and the values sent as part of the service request are used instead.
Tasks contain tests
Finally, tasks may contain tests. Each test consists of running the task with the supplied arguments, then making assertions regarding the results generated -- for example, that that hit-count is a non-negative integer. Since the testing facilities are under active development at the time of writing, and liable to change, they will not be described in detail.
Step
The last concept in the model is that of a step. Although tasks also carry test arguments and tests, these are accessories: the core of a task is the sequence of steps that it contains, and it is only these that affect the actual functioning of the task when is run in the Engine.
A step has a type, chosen from a finite set of (at the time of writing) seventeen. The type can be thought as the operation code of the instruction that runs on the domain-specific virtual machine that is the Engine. We frequently refer informally to step types simply as steps, as in "Oh, use a Parse by Xpattern step for that".
Some steps are appropriate for init and search tasks, some for parse or next, and some are applicable everywhere. Analyzing a pool of extant connectors shows the following patterns of usage:
inittasks use steps: Click, Open URL, Extract regex, Retry and Set form value.searchtasks use steps: Click, Open URL, Normalize URL, Parameterized result, Extract regex, Retry, Set preference, Constant result, Set form value, Next if, Submit form, and Transform result.parsetasks use steps: Click, Join result, Open URL, Normalize date, Normalize URL, Parse by regex, Parse by Xpattern, Retry, Split result, and Transform result.nexttasks use steps: Click, Extract regex, Retry, Set preference and Constant result.
It's apparent that the very general Click and Retry steps are used in all four tasks, and Extract regex in all but the parse task, while more specific steps such as Parse by Xpattern and Normalize date are used only in the parse task.
Step configuration
Each step carries its own configuration; and the type of the configuration varies by step type. For example, an Open URL step's configuration consists either of the URL to go to, or the name of an argument that contains the URL to go to. At the other end of the complexity scale, the Transform step is configured by the name of a result-list to act on, a result within that list to use as input, a regular expression to apply to the value that result, a string to substitute for the portion that matches the regular expression, and the name of a result within the list to write the result of the substitution back to. (This sounds more complicated than it is -- stay with it, it will all make sense when the time comes.)
The different configuration parameters of each step type are surveyed in the reference section of this manual.
XML Representation
The structure of connectors, as described here, lends itself nicely to a simple expression in XML. The XML format used is described in a separate section. The Relax-NG specification for that XML format can be thought of as a formalization of the description on this page.
Components
Builder
The Connector Builder is implemented as an extension for the Firefox web-browser, and requires a version in the 3.x series. Because of its tight integration with the browser, porting the Builder to IE, Sarafi, Chrome or Opera would be a significant undertaking -- most likely not possible at all for some of these browsers, as they do not all make the same facilities available to extensions.
There are two ways to install the Builder: most users will install from a .xpi file, the standard packaging for Firefox extensions. The most recent release of this can be obtained from Index Data -- email us for details. Developers and others who need the bleeding-edge version of the Builder can check out the source code and modify their Firefox configuration by hand to run the extension directly from the source. This is done by adding a file named cfbuilder@indexdata.com to the extension directory, containing only a single line that specifies the directory holding the Builder source-code: for example /usr/local/src/git/cf/builder (depending on where the source was checked out). The location of the extension directory is different on different platforms -- for example, on MacOS X, the global extensions area is /Applications/Firefox.app/Contents/MacOS/extensions/
When running Firefox in a configuration that includes the Builder extension, the browser can be used normally, invoking the Builder only when required. It can be brought up by choosing View → Sidebar → Connector Framework: Builder.
When the Builder is active, the browser is split into two vertical columns. On the left is the Builder; the right column contains the old contents of the browser window. Its contents are unchanged, and all the navigation buttons (Back, Forwards, Reload, Home, etc.) work as usual on it. The Builder does not impinge on the normal use of the browser.
The builder itself is split vertically into three main areas: at the top, and area concerned with the current task; below that, a list of the steps that make up that task; and below that, a display of results generated by the last connector run. Slider bars between these sections adjust the amount of vertical space allotted.

In more detail, top from to bottom, the Builder presents:
A title bar showing the name cfBuilder and a close button.
A toolbar containing buttons to create a new connector, load an existing connector, save the current connector or save it as a new file, add a task, remove a task, edit the connector's metadata, go to the connector repository's administrative home, or upload the current connector to the repository. These operations will be discussed in more detail below.
A dropdown for selecting which task to work on. Nearly all connectors have Search, Parse and Next tasks; others can be added, notably Init.
A list of the selected task's arguments. For example, Search tasks have arguments for the various fields they might search, and Init tasks have arguments for the username and password that can be used in authentication. When a connector is run as part of a searching solution, values for these arguments are submitted at run-time (e.g. the query terms); the Builder allows example values to be saved, for use when running the connector while developing it.
A toolbar containing buttons that relate to steps within the selected task: with these, it is possible to add a step after the currently selected one, delete the current step, move it up or down the list, run the current step in isolation, or run the whole sequence of step that make up the task. These operations will be discussed in more detail below.
The list of the actual steps, showing for each step its type (in bold), a summary of its configuration (in normal font), and an indication of whether or not it is an Alt step (i.e. one that is run when and only when the step before it fails).
An area containing the results generated by running steps of the selected task. For Search tasks, this is typically a single number, the hit-count; for Parse tasks, it is a list of records, each containing multiple fields.
An area for creating and running tests for the current task. At present, this requires providing paths through the result structure and regular expressions that the contents of those paths must match.
Finally, a status line indicates whether or not the connector is considered complete, and if not provides a link to a popup that shows which tasks are missing.
Engine
The Connector Engine (documented here) is a C++ based library that embeds the Gecko layout engine which underpins Firefox, Thunderbird and Firefox OS. It exposes a binding to the same core Javascript code for loading and running connectors that the builder uses. Several tools build on this library:
- CFWS is a webservice for running connectors. It's implemented as a Metaproxy plugin.
- cfrun is a standalone binary. Convenient for running connectors at the command line, in shell scripts, and cron jobs.
- cfzserver is a more specialised Metaproxy plugin that exposes a Z39.50 interface to connectors based on our search template.
Repository
The Connector Repository (documented here) is an administrative tool used to manage all connectors available for use, development or enhancement via Index Data’s Connector Platform.
The repository presents a single, unified interface for all connectors, including those in production, in development, or not currently in use. It also features automated testing for all existing connectors, as well as an integrated display of reliability statistics drawn from actual production usage.
Data Model
The basic interface
In many steps you will see an interface like this. It's for specifying where to store or retrieve a value.

The several drop down boxes each mean different things, but all of them are still quite related as you may find out in the advanced section
First drop-down: Container
In the first box you can choose from a set of containers for storing and retrieving values:
- input: arguments passed to the Task
- output: returned on Task completion
- session: values that you wish to be available in all Tasks (not reset between runs)
- system: runtime values, currently only has a
locationkey containing the current URL - temp: starts empty every time and is never returned
The data browser at the bottom left of the builder reflects the values in each container as they were at the end of the last Task execution.
Second drop-down -> Keys
You can choose from a list of keys (names for the value) that were defined in the Template, or you can name values as you please.
Generally the Template will provide all the names which external programs using the connector will expect in the output container and all the input they may pass in.
Third and fourth drop-downs -> Records
Some templates may specify a key which refers to a list of records. In the search template that ships in our default configuration there is only one: "results". The third drop down allows you to apply a step to a particular field in every record within such a key.
The fourth and final dropdown is for lists within each record. The search template defines the key "item" here to refer to holdings records containing the location, availability, etc.
Record lists are currently only populated by the XPattern step.
Appending, Concatenating and Replacing
When configuring the target for a step to write to you will notice three radio buttons providing options for how to handle any values already at that key.
- append: leave existing values and add the new one to the end of the list
- concatenate: append the new value to the end of the string in the target key
- replace: replace any existing value with the one generated by the step. If the step would produce an empty result the key will be deleted.
In-line value replacement.
Many steps will accept a reference that will be replaced with whatever data is currently in the specified location. To distinguish this from the rest of the string you use the unlikely {$ combination, like so: {$.container.key}. For example, you could configure Go to URL with a URL of "http://www.site.tld/sections/{$.input.database}" and the last part of the URL would be replaced by the parameter passed in as "database" when the Task is run. This shorthand will only take the first value in any given array. To display all values (for example, a list of authors delimited by semicolons), use the Join step to concatenate them together into one string in the temp container.
Advanced mode
Behind the scenes the steps find the values to run with by generating a JSONpath query from your step configuration. When you click on the "Advanced" button it switches to an interface that expresses your setting as a JSONpath that matches a set of objects and the key to operate on.
Each instance of a Task contains a data object with properties that store the input, output, temp objects for the current invocation. The data object also contains references to the session and system objects stored within the current Connector instance so that they persist for the lifetime of the Connector session.
The basic interface only applies to structures like the ones described in the search template. At the top level, each space (input, session, etc.) is an object where each key contains an array. This allows for multiple values to be stored and for consistency with the record contents. All steps operate on arrays. The only exception is that, for compatibility reasons, Tasks can still accept scalar properties in input.
If, instead of scalars, an array property contains objects, it is treated as a list of records. The only step that typically will output an array of objects into a key instead of an array of scalars is XPattern. Each object in this array has several array properties. For example, a record representing a book would have an author property containing an array of strings containing the names of all authors of that work.
Here in JSON notation is an example with structures typical of search template data:
{
  "input" : {
    "keyword" : [ "water" ]
  },
  "output" : {
    "somevalues" : [ "one", "two", "three" ],
    "results" : [
      {
        "title" : [ "First Result" ],
        "author" : [ "Bob", "Jane" ]
      },
      {
        "title" : [ "This is My Last Result" ],
        "author" : [ "J. Shaddix" ],
        "item" : [
          {
            "location" : [ "Library of Alexandria" ],
            "callno" : [ 5555 ],
            "availability" : [ "On Hold" ]
          },
          {
            "location" : [ "Library of Alexandria" ],
            "callno" : [ 5555 ],
            "availability" : [ "On Hold" ]
          },
          {
            "location" : [ "Libraria Lello" ],
            "callno" : [ 42 ],
            "availability" : [ "Missing" ]
          }
        ]
      }
    ]
  },
  "temp" : { },
  "session" : {
    "proxyip" : [ "127.0.0.1" ]
  },
  "system" : {
    "location" : [ "http://library.tld/catalog.cgi" ]
  }
}
Steps access the data using the JSONpath query language. The data object is passed along with the path specified in the advanced interface or generated from the basic interface. During step execution this path is used to fetch objects to operate on. A separate field in the advanced interface specifies which key of each object is used. This layer of indirection is necessary as JSONpath only returns the matching values; no context is provided. Because there is no way to pass a reference to a scalar it would be impossible to modify a set of matching strings. Objects and arrays are passed by reference and so we collect a set of objects and modify the values within the key. While we could modify the arrays directly, we would be unable to add or remove the key from the parent object.
Generally speaking you can use arbitrary JSONpaths to select objects in steps. However, if a step is to output the result to a different path than the source, there must be exactly the same number of objects matching the destination path.
Detailed documentation of JSONpath is available from the author. Here are some common examples of how one might use some of its features with Connector Platform data:
Top level values
Access the hits value in the output space:
Path: $.output Key: hits
The path selects the object matching $.output ($, the root of the path, is the current task's data property). The step will then operate on the array in the hits key of that object.
Record field
Operate on the author of every record in the results keyword:
Path: $.output.results[*] Key: author
[*] indicates that it should select all items within the $.output.results array. Those items are the record objects from which the step obtains the author value.
Choosing among records---JSONpath filtering
Rather than use * to select every value in an array you can instead choose a subset of the objects to work with by including a Javascript expression wrapped in ?(...). This is evaluated against each element and only those where the expression returns true are included in the result. Within the expression you can use the @ symbol to refer to the current element.
As an example, you might use a Copy step to copy the "abstract" field into "description" for records that have no description. To do this you would use a JSONpath of $.output.results[?(!@.description)] and a key of abstract in the source and description in the destination.
Perhaps you want to delete journal title fields starting with "N/A". Or run pretty much any step on some set of records based on nearly any criteria. JSONpath, while awkward at times, can usually pull it off.
Core features
Alt steps
In the builder, to the right of the Steps list, is a column of checkboxes labelled "Alt". These allow you to mark a step as an alternative, to run in case the preceding step fails. Alternatives will be tried in succession. For instance, the second alternative will only run if the first alternative ran and failed. If the second alternative also fails, then the third alternative will run, and so on.
To run multiple steps on failure see [Try / Catch](#steps-try_catch].
Page Load Detection
Sometimes you don't want steps to fire in rapid succession. If you use the Go to URL step to open a web page and proceed to use Set form value, it needs to finish loading the page before it can access the form element in order to fill in the value. Were it to try beforehand, it would fail with a "destination element not found" error. To handle this situation, steps such as Click, Go to URL, and Submit offer a checkbox marked Wait for page load?. If clicked, task execution will not proceed to the next step until the web page has finished loading.
Wait configuration
Usually just ticking the box will handle most needs but there are more settings available from the "Configure load detection..." button. You can set the amount of time to wait (in milliseconds) before the system gives up on waiting and proceeds with the next step. The default is 30000 (30 seconds).
The other option available is to select the mechanism by which page load is detected, each of which may expose further configuration. A detailed description of these methods follows. However, such information should only be necessary for debugging the thorniest of connectors.
nsIWebProgessListener and nsIObserver
When a page starts to load the corresponding nsIRrequest object is added to a list. Stopping causes the request to be removed and the list to be checked for more in progress. If it's empty, the system waits a small amount of time in case any new page loads are forthcoming. This defaults to 20ms but can be configured arbitrarily as the "New load threshod". Once this time has passed and if the list is still empty, execution resumes with the next step.
This is the default method of load detection and entails implementing two different XPCOM interfaces. It uses nsIWebProgressListener to receive notifications about the state of the window, most importantly STATE_START and STATE_STOP.
XMLHttpRequest (AJAX) connections do not trigger this. In order to listen for these, we implement the nsIObserver interface and subscribe to the http-on-modify-request (treated as the start of the request), http-on-examine-response and http-on-examine-cached-response (stop) notifications. This is optional---perhaps the only XHR events on the page are ad-related and waiting for them would only slow things down.
On very rare occasions there are requests that fail to trigger the appropriate notification when they complete. There is an option to "Remove non-pending requests" that will be more aggressive at pruning the list of outstanding requests at a small risk of removing some before they start or while they are still waiting. See the nsIRequest.isPending() documentation for details.
nsIObserver only
Rather than use both interfaces, this method relies solely on nsIObserver. It uses the same three notifications as above but waits for all connections rather than only tracking XMLHttpRequest. This is simpler and may become the default in future. We've left the original approach intact to preserve behaviour of existing connectors and for more realistic performance in the builder. There is only one @mozilla.org/observer-service;1 for the whole browser which means running the connector in the builder while you have other pages performing requests may cause it to wait longer than necessary. In practice I find I have to have a few other tabs open and fairly actively making connections to even notice this effect.
Window event
When you're really only concerned about the document being opened and aren't interested in waiting for other frames, redirects or AJAX requests it is enough to wait for one of the events dispatched to the window object. The ones we have found useful for this purpose are configurable here: DOMContentLoaded, load, and pageshow.
Retrying
An alternative to waiting for the page containing the target object(s) to load is to simply keep attempting to access them until they become available. To this end you can configure the Retry step as an alternate following a Click, Set form value or other step that targets an element in the page. With the Alt checkbox ticked, the Retry step will only fire if the preceding step fails, allowing the task to keep running the element-requesting step until it succeeds.
A similar approach can be used to halt task execution until a page element has a particular value. Follow an Extract value step with an Assert that tests your condition. The alternative to run if that Assert fails can be a Retry configured to wait an appropriate amount of time and go back two steps causing it to extract the new value and test it again.
Xpattern
Grammar
The following defines the grammar of the XPattern:

<pattern> ::= <orlist> | <orlist> ':' <pattern>

<orlist> ::= <node> | <node> '|' <orlist>

<node> ::= <elementname> <opt-cardinality> <opt-assignment> <opt-modifierlist>
           <opt-attrlist> <opt-childnodes> <opt-negation> |
      '(' <pattern> ')' <opt-cardinality> <opt-assignment>

<elementname> ::= <name> | "any" | "#text" | "#comment"

<opt-attrlist> ::= "" | "[" <attrlist> "]"

<attrlist> ::= <attr> | <attr> "," <attrlist>

<attr> ::= "@" <name> <opt-relation> <opt-assignment> | <regexp>

<opt-relation> ::= "" | <compare> <value>

<compare> ::= "=" | "~"

<opt-modifierlist> ::= "" | <modifier> <opt-modifierlist>

<modifier> ::= "-html" | "-xml" | "-textcontent" | "-whitespace"

<opt-childnodes> ::= "" | "{" <pattern> "}"

<opt-assignment> ::= "" | "$" <name>

<opt-cardinality> ::= "" | <plain-cardinality> | <plain-cardinality> <nongreedy>

<plain-cardinality> ::=  "?" | "*" | "+"

<nongreedy> ::= "?"

<regexp> ::= "/" STRING "/"

<value> ::= INTEGER | "\"" STRING "\""

<opt-negation> ::= "" | "!" <node>

<name> ::= HTML-friendly name, i.e. string starting with a-z followed by a-z0-9_. Match is case-insensitive.
Whitespace is generally ignored
Regular nodes
The XPattern is basically a sequence of nodes, for example
BR : A $title : B $authorThe node names (BR, A, B) match corresponding HTML tags. Although the match is not case sensitive, traditionally the tags are written in upper case. The pattern above would match an HTML fragment like
<br/>
<a href="...">Some Title</a>
written by <b>Some Author</b>
and return one hit, with a title and author. If there happens to be another segment like that on the web page, that will be returned as another hit. Note that the text "written by" is skipped, as it is not inside a matched node.
HTML tags can be nested to any depth. XPattern supports nesting too. Child nodes are indicated by enclosing them in curly brackets, as in
TR { TD $title : TD $author }which would find two hits in something like
<table>
  <tr>
    <td>The Little Mermaid</td>
    <td>H.C. Andersen</td>
  </tr>
  <tr>
    <td>Hamlet</td>
    <td>William <u>Shakespeare</u></td>
  </tr>
</table>
Note that in the second example, the value returned for author would be "William Shakespeare". It does not matter that the tag contains other tags (in this case, U for underlining the last name).
if the pattern had been something like
TR { TD $title : TD $firstname { U $lastname } }it would have returned 'Shakespeare' as the lastname, and only 'William' in the firstname. But that would have missed H.C. Andersen completely.
Cardinality
XPattern can handle nodes that are optional, repeating, or both.
Optional: ?
A question mark indicates the node is optional.
A $title : I ? $author : B $year : Pwould find the two first hits (but not the last one) in something like this:
<a href="...">First title</a>
 by <i> First author </i>
 <b>1999</b> <p/>
<a href="...">Second title</a>
 <b>1999</b> <p/>
<a href="...">Third title</a>
 by <i> Author </i>
 and <i> Another Author </i>
 <b>1999</b> <p/>
Repeating: +
A plus indicates a repeating node. There has to be at least one of them.
A $title : I + $author : B $year : Pwould find the first and third hit in the HTML example above, but not the second, as it has no author. The third hit would have two separate authors.
Optional repeating: * An asterisk indicates that a node is both optional and repeating. That is, there can be zero or more of them.
A $title : I * $author : B $year : PThis would find all three hits in the HTML example above.
Greediness: +? and *? By default all repeated patterns are greedy, meaning that they match as much as possible. Sometimes it is desirable to match as little as possible instead. This can also be much more effective, especially with ANY, which can try to match the rest of the document, before backtracking to only a few nodes.
As an example
A $title : ANY * : B $year would match one hit from the HTML example above, namely the first title and the last year. This is probably not what you want. A non-greedy match solves this problem:
A $title : ANY *? : B $year Now the ANY matches a minimal set of nodes, that is the author(s), and the B will match the first year. This way we get three hits from the same HTML example, each with a title and year that belong together.
Attributes
HTML nodes can have attributes. Xpattern can collect their values into result variables, and it can require that a given attribute exists, and even that it contains a given value.
Attributes are enclosed in square brackets. They come after the cardinality and assignment.
Attribute names start with '@', as in XPath.
Collecting values
Often we want to extract the attribute value, for example the URL from an A tag.
A [ @href $url ]Matching attribute names
Some times we want to match only nodes that have a given attribute.
SPAN [ @highlight ]will match any SPAN that has a highlight attribute, no matter what value it has
Matchign attribute values
Often we want to match only nodes that have a given value in an attribute
SPAN [ @class="title" ]or with a regular expression:
A [ @href ~ "author"  ]


A [ @href ~ "indexdata\.com/search\.cgi\?title=[A-Z]"  ]
Note how the dots are escaped with backslashes, so they won't match any other characters, like they do in regular expressions.
Text match
Occasionally it is necessary to match the content of a node, not the structure of the page. This can be done with the text match.
The text match is placed together with the attributes inside the square brackets. The match is case sensitive, and will match against the text-content of the whole node. It is a full-fledged regular expression.
Typically this is used for web pages that do not have enough structure, or that have multiple types of hits, when we only want some of them. For example
TR { TD [ /Book/ ] : TD ... }can be used to match only books from a table-formed page, where the first element tells what type of thing it is, as in
<tr>
  <td>Article</td>
  <td> ...</td>
</tr>
<tr>
  <td><b>Book</b></td>
  <td>Some-Author</td>
  <td>Some-title</td>
</tr>
Note that it does not matter if the TD element contains other tags, the match is against the full text content of it.
This kind of thing is especially useful when combined with alternative sub-patterns, as in
( TR { TD [ /[Bb]ook/  ] : TD ...  }  ) |
( TR { TD [ /Article/  ] : TD ...  }  )
Note that in the example above, the regular expression makes use of the character class to match both 'b' and 'B'.
Special nodes
ANY
As the name implies, the ANY node matches any kind of html node. It is useful for skipping uninterested parts of a hit, especially when modified by the non-greedy repeat *?
#text
Normally the XPattern collects the text from inside regular nodes. Occasionally it is necessary to descend to a lower level, and pick up a #text node directly. For example in
<span>
  Some Author:
    <i>Some title</i>
  Lots of <b>description</b>
</span>
This can be extracted with something like
SPAN { #text $author : I $title : ANY * $description }Note that since the description contains various tags, we use ANY * for it. This will be a greedy (maximal) match that will take the rest of the SPAN. The same result could be achieved with
SPAN $description { #text $author : I $title }where the whole SPAN goes into the description, except for the author and title. This is cleaner and probably more efficient way of doing it.
#comment
Very rarely it happens that the web page contains useful information inside a HTML comment
<span><!-- id 99999--> <b> Author</b>...This can be extracted with the #comment pattern
SPAN { #comment $id : ... }Since the graphical editor works on the level of tagged nodes, it can not highlight #text nodes. And certainly not #comment nodes, as they are not visible at all.
Modifiers
There are some modifiers that change the way XPattern matches and collects data.
-whitespace
The -whitespace modifier causes the XPattern not to clean up white space around and in the node, but to collect it all as it is.
-textcontent
Normally, the XPattern collects the text of the node, and then recurses deeper into the DOM tree to get the rest of the tet. The -textcontent modifier makes it collect the complete text content of the node and all its children. The XPattern still continued into child nodes, and may collect them into different $variables. This is useful if you have something like this:
<span>A collection of plays by <A href=...>William Shakespeare&</A> that everyone should know</span>By collecting the description with something like
SPAN $description -textnode { A ? $author }you get the author in $author, but your description will contain the whole text. Without the -textnode modifier, your description would be A collection of plays by that everyone should know, because the author was going into another variable.
-html
The -html modifier gets the HTML code of the node, with all tags, attributes, comments, and everything. This is useful in some rare cases. In the example above, using -html modifier on the SPAN would capture
A collection of plays by <A href=...>William Shakespeare&</A> that everyone should know-xml
The -xml modifier is almost like the -html, except that it produces a dump of the dom-tree under the current node. It should have all the nodes, comments, and text, but may contain a different kind of white space than the original source. It will also work for XML documents, which the -html modifier can not work on.
XPattern modifiers were introduced in version 2.18
Groups and alternatives
Grouping in XPattern is indicated by (round) brackets, and alternatives by the pipe character '|'.
Alternatives |
Some web sites are not consistent in the way they present the results. For example, they can put the author before the title, or after it.
SPAN { B $author : A $title  } |
SPAN { A $title : B $author  }
This will match either of the two alternatives. This is fine, when the alternatives are single nodes, as above (it does not matter that the SPAN contains a complex sequence of child nodes, itself is still just one node).
Or-bags
A common structure is to have a repeating group with alternative entries, as in
(
   SPAN $author [ /Author:/  ]  |
   SPAN $title [ /Title:/ ]
) +
This will match any sequence of authors and titles, no matter in which order they come. Sometimes it is useful to put a ANY in the end of the list, to skip those parts that we are not interested in.
Alternative groups
When the structure is more complex than above, it may be necessary to use alternative groups, as in
BR :
( B $author : A $title  ) |
( A $title : B $author  )
Named groups
Named groups can be used to extract more structured information from a web page. A typical example is holdings information from a library catalog:
TR+ { (TD $callno : TD $available ) $holding }This will produce structured hits like the following XML:
<holding>
  <callno>1234</callno>
  <available>not yet</available>
</holding>
<holding>
  <callno>6789</callno>
  <available>real soon now</available>
</holding>
Alternative XPatterns
Some sites show results in different formats, for example books in one way, and article journals in a completely different way. Then it may make sense to use an XPattern that combines the two separate alternatives into one XPattern like this
( SPAN { B $title : U $isbn  }  ) |
( SPAN { B $title : I $issn  }  )
The designer will recognize such patterns, so you can get far with clicking and highlighting.
Negation
Some times you need to match a sequence of any nodes, as long as they are not bold. This can be done with
ANY + ! BHere is a more complex example
Suppose you have a page with bibliographic data coming in no special order. All you know that the title is always first, and everything is in plain text, separated by BR tags, like this:
Title: Master and Commander <br/>
Author: Patrick O'Brian <br/>
The first book in the series. <br/>
Captain Jack Aubrey, R.N., befriends Stephen Maturin, ship's surgeon and intelligence agent... <br/>
Publisher: W.W. Norton<br/>
Title: Post Captain <br/>
Publisher: W.W. Norton<br/>
Author: Patrick O'Brian <br/>
The second book in the series. <br/>
"We've beaten them before, and we'll beat them again." <br/>
In 1803 Napoleon smashes the Peace of Amiens...<br/>
Since you know every hit starts with a title, you start your pattern with that:
#text $title [/Title:/] : brSince the rest can come in what ever order, you use an or-bag to collect matching lines
#text $title [/Title:/] : br :
(  ( #text $author [/Author:/] : br  )
 | ( #text $publisher [/Publisher:/] : br  )
 ) +
So far so good. But you need the description too. If you just add a default line to the or-bag like this
#text $title [/Title:/] : br :
(  ( #text $author [/Author:/] : br  )
 | ( #text $publisher [/Publisher:/] : br  )
 | ( #text $description : br  )
 ) +
things go horribly wrong. This pattern will match the whole page in one record, with multiple titles and authors. You need a way to stop the or-bag from matching the next title. Since neither the author or publisher lines will match it anyway, you need to put the stopper on the description. That's where the negation comes to its own:
#text $title [/Title:/] : br :
(  ( #text $author [/Author:/] : br  )
 | ( #text $publisher [/Publisher:/] : br  )
 | ( #text $description ! #text [/Title:/] : br  )
 ) +
Now the description line will not match any #text (that is not matched above), except if that one happens to contain the word Title.
The negations are not restricted to single nodes:
TD { SPAN { B $title } } ! TD { SPAN { B {A} } }which matches a TD that contains a SPAN that contains a B, except if the B contains an A. Of course the same can be expressed more simply:
TD { SPAN { B $title ! B {A} } } Keyboard shortcuts
NB: On OS X we use Command instead of CTRL as per Firefox.
| Global | |
|---|---|
| Add step | CTRL-ALT-T |
| Add comment | CTRL-ALT-C |
| Next task | CTRL-ALT-LEFT |
| Previous task | CTRL-ALT-RIGHT |
| Next step | CTRL-ALT-DOWN |
| Previous step | CTRL-ALT-UP |
| Next test | CTRL-ALT-, |
| Previous test | CTRL-. |
| Run task | CTRL-ALT-G (go) |
| Run selected | CTRL-ALT-H |
| Show CF builder | CTRL-ALT-F |
| Show metadata editor | CTRL-ALT-M |
| Show step scratch pad | CTRL-ALT-P (pad) |
| Repo test | CTRL-ALT-E |
| Ninja test | CTRL-ALT-J |
| Step list and scratch pad | |
| Copy | CTRL-C |
| Cut | CTRL-X |
| Paste | CTRL-V |
| Delete | Del |
| Disable | D |
| Select sequence | hold Shift, use arrows |
| Select multiple | hold Ctrl, use arrows and space |
| New step window | |
| Show all steps | CTRL-A |
Tips and tutorials
My first connector (The AMNH Digital Library)
Let's build a connector!
Let's say that we want to make a connector for the online digital library of the American Museum of Natural History. The AMNH has digitized more than a century of publications and makes them freely available, so it's a useful resource to make available to metasearch systems.
Reconnaissance: searching the website by hand
Before we try to build the connector, we'll search the site using an ordinary web-browser to check that it supports the necessary operations.
Start by navigating to the the digital library home page at http://digitallibrary.amnh.org/dspace/
We notice that it's possible to do a simple keyword search from the front page, and that there is also a link to an advanced search page. To keep things simple, we'll start with the keyword search, and return later to the advanced search.
In the box below the caption Search by words or numbers, enter the query dinosaur. (In the radio-button group below, leave All Publications checked: later on we can treat the publications separately if we want to, but for now we will accept all matching documents from any of the listed publications.) Hit the Search button.
The search-results page page shows the first 10 of 85 hits. These are helpfully laid out in a table, each row giving the publication's date, its title including some citation information (with a link to a detail record), and the authors (including their birth and death dates in most but not all cases.)
Click through the first hit, Relationships of the saurischian dinosaurs. American Museum novitates ; no. 2181. The detail record includes more information about the resource and a link to a PDF of the full text. Return to the results list.
Now click on the next link at the bottom of the table containing the ten hits. This leads to a page that shows results 11-20. Click on this page's next link, and the destination page shows records 21-30.
All is as it should be. Now we can start to build the connector, which will perform all the same actions on our behalf that we just performed by hand.
Building the connector
Open the Builder sidebar, either by Selecting View -> Sidebar -> Connector Framework: Builder from the main menu, or using the shortcut Shift-Ctrl-C.
If this is the first time you've used the Builder in this browser session, then it will be set up ready to make a new connector. If not, you may have another connector already loaded: in this case, start a new connector by choosing Tools -> Connector Framework -> New from the main menu or clicking on the New Connector icon that it on the left of the sidebar's top toolbar.
In the main window, go back to the AMNH Digital Library home page. Now we're ready to begin.
No init task
Using the AMNH site does not require any authentication, so there is no need for an init task in this connector. We can get straight to work on telling the connector how to search.
The Search task
Make sure that the Current Task: dropdown near the top of the Builder sidebar is set to search -- if it's not, then change it.
The first step: going to the search page
The first step of submitting a search is getting onto the page where it's to be submitted from, so make a new Go to URL step. Click on the Add Step button -- the big plus sign that is the first button in the Steps toolbar about half way down the sidebar, and the Step Browser pops up, offering you a choice from among all the different types of step. Double-click on Go to URL (or click on it once, then hit the Add button at the bottom of the Step Browser).
Three things happen when you do this:
The Step Browser closes itself.
A new and empty Go to URL step is added to the task, and can be seen in the step list just below the Steps toolbar.
The step configuration pane leaps into existence, to the right of the sidebar and below the main window. This pane contains different controls depending on the type of the currently selected step.
For a Go to URL step, the important element of the configuration is the location to go to. This is presented as a textbox that a URL can be typed or pasted into, but since we are already on the right page, we can take the shortcut of clicking the Use current page button to the right of the textbox.
Clicking the button makes two things happen:
The textbox in the step configuration pane is filled in with the URL of the current page (i.e. the AMNH Digital Library home page).
That change in the state of the step is reflected in the step list over in the sidebar: the step's summary now contains the URL as well as the type.
The URL in the step list also changes if you edit the URL in the step configuration pane by hand. The step list always contains a summary of all the steps that make up the current task. Each step's summary consists of the step type, in bold, followed by an informative snippet of the configuration, which again is different depending on the type of the step.
You can always test a step by clicking on the Play button in the Steps toolbar: it's the right-pointing triangle that is fifth from the left. Since you're already at the AMNH page, navigate away to any page you like, and then hit the Play button. The builder will run the new Go to URL step, which will take you back to the AMNH Digital Library front page.
Setting the form value
Having loaded the search page, the next step is to type in the value to be searched for. To see that in action, we're going to need a value to test with, so enter the search term dinosaur as the keyword argument in the list of Test Arguments near the top of the sidebar. These test arguments are saved as part of the connector, although they are not used when running the connector in production: they are are purely for the benfit of the Builder and the developer using it.
Now we can add a Set form value step. Open the Step Browser and double click on the step name. The new, empty, step appears below the existing Go to URL step in the step list, and the step configuration pane changes to show the configuration of the new step.
Click on the Go to URL step in the step list and watch the configuration pane change to show the URL that was specified in the configuration for that step; click on the Set form value step in the list and the configuration pane changes back again.
In the configuration pane, the textbox labelled Form field to populate should contain an XPath specifying which element on the page is to be set to the specified argument. Rather than typing in an XPath, it's usually easier to use the node selector, and that's what we'll do now. Click on the Select node button. Now as you move your mouse around the contained web page, a dotted purple outline follows the mouse, showing which of the page's elements is being pointed to. Point at the search box and click: the textbox in the configuration pane is filled with a complicated XPath that designates the selected textbox.
Now we can test the new step. Hit the Play button and the word dinosaur appears in the search box.
When building a connector for a more complex search form, multiple Set form value steps will be used to set multiple values -- for example, separate author, title and date values.
Submitting the search
Having filled in the form, we need to submit it to the server. There are two ways to do this: with the Submit form step or with Click. We'll use Click.
As usual, open the Step Browser and double-click on the Click step. As usual, the new step is added to the list in the sidebar, and its empty configuration appears in the step configuration pane.
As with the Set form value step, this is configured by an XPath that indicates which element of the page to click; and as before we can use the node selector to do this. Hit the Select node button, and click on the contained page's Search button to fill in the XPath.
Now you can click on the Play button to check that the form submission step works as intended. When you do so, the contained page will change to show the first page of results.
Extracting and cleaning the hit-count
When a Z59.60 or SRU client sends a search request, the response has to specify how many records were found, so our connector has to extract this information from the results page.
To do this, we will need two steps: Extract value and Transform result.
Add an Extract Value step, and in the new step's configuration pane use the node selector to choose the text area that contains the text "Results 1-10 of 85." Run the step to check that it works correctly. Now for the first time we are using the Results area near the bottom of the Builder sidebar: the single result, called hits, has the value "Results 1-10 of 85." (i.e. the content of the nominated area of the contained page.)
Now add a Transform result step. This is one of the most complex and powerful of all the steps, but for now we can ignore the five fields at the top of the configuration pane and use one of the pre-canned recipes at the bottom. Click on the Last number button, and note that the configuration fields above are filled in. Hit the play button to check that the transformation has worked correctly.
In this case there is an interesting wrinkle: the Last number recipe pulls out the last sequence of digits, commas and periods from the value it's working on, so that it can work on decimals as well as whole numbers. This has the undesirable side-effect that the terminating period of the sentence "Results 1-10 of 85." survives the transformation. As it happens, this is good enough: the numeric value of the string "85." is 85, so we don't need to do anything about this.
Extra credit: getting rid of that terminating period
If you are the kind of person who likes things to be neat and tidy, you can remove the period by adding another Transform result step, setting the Regular expression to \.$ and leaving the replacement text empty.
Testing the whole search task
The connector's search task is now complete. To check that it does what it should, you can use the Play All button on the Steps toolbar: it's the one on the right, and it looks like the Play button with an additional vertical bar to the left of the triangle.
When you press this button, each step in the task is run in turn. You will see the contained site in the main window switch back to the AMNH Digital Library home page when the Go to URL step is run, then the word dinosaur appear in the search box when Set form value is run, then the form being submitted when Click is run, and the page will change to the result list. Then, too quickly to see the individual steps happening, the hit-count will be extracted and transformed.
While this is happening, the step configuraton pane is replaced by a log explaining what the connector is doing. This can be useful when debugging complex connectors. As soon as you click on a step in the list, or add a new step, this log is replaced once more by the configuration pane.
Congratulations, you have completed your first task!
The Parse task
Make sure that the Current Task: dropdown near the top of the Builder sidebar is set to parse -- if it's not, then change it.
Once a connector has obtained a page of search results, it needs to pick that page apart into separate records, and the records into separate fields, in order to have useful information to report back. The Connector Framework supports two separate approaches to parsing result pages: parsing by regular expression or by XPattern.
The regular expression parser works directly on the HTML of the results page. As a result, it is very powerful and general, but tends to be an absolute pig to work with. It remains an important tool to use as a fallback when other approaches fail, but it has for most purposes been superseded by the XPattern parser, which works at a higher level, dealing with nodes of the parsed page rather than with raw text. Because it works at this higher level, the XPattern parser is able to offer tools that help you to build a pattern, often very easily.
Once data has been extracted from the page, it can be cleaned up using transformatins like the one we used in the search task to tidy up the hit-count.
Initial parsing
Use the Step Browser to add a Parse by XPattern step -- the first step of the new parse task. As usual, the step configuration pane appears. Rather than typing in an XPattern, we will use the Builder to help us create one: this is done by clicking on various elements of a sample record and specifying which field of the result record the values should go into.
In the step configuration pane, click on the Start creating a pattern button. A new message appears in the configuration pane, "Please click on some part of a good hit", along with some buttons that we can ignore for now.
Do as the instruction says: click on the first interesting part of the first hit, the date "1964". Immediately this is highlighted, and an entry describing this field is added to the configuration pane, highlighted in the same colour. As well as the value, this entry contains a dropdown for specifying which field of the output record should be set from this part of the page. From this dropdown, choose date. We can ignore the other parts of the entry for now.
Click on the Add another node button below the newly created entry, and then on the next interesting part of the record, the title Relationships of the saurischian dinosaurs. American Museum novitates ; no. 2181". This is highlighted in a different colour, and a new entry is appended. From this entry's first dropdown, choose the field title.
This field in the results page has an important difference from the others: it is a link to the full-record page (which in turn has the link to the full-text PDF). We need to get at the full-record link so that it can be returned to the search client, so click on the title entry's Attributes button. Another line is added to the title entry, allowing an attribute from the title to be captured. In this case, we want the href attribute, which is selected by default, and we want to copy it in to url field: choose this fieldname from the dropdown after the going into caption.
Finally, we need to capture the author. Click once more on the Add another node button, then on the first record's author, "Colbert, Edwin Harris, 1905-", and set the fieldname in the dropdown to author.
Now we are ready to generate the XPattern. Hit the generate a pattern button at the bottom of the configuration pane, and the XPattern textbox will be filled in with a pattern describing the set of result-page fields and output-record fields we've nominated:
TD $date : TD { A $title [ @href $url ] } : TD $author
And now the magic happens. Click the Play button above the step list and gasp in awe at the parsed data that fills the Results area at the bottom of the sidebar! (You will need to resize the Results area in order to see more than one or two of the result records.)
Cleaning the parsed data
Looking at the records in the Results area, we can see that:
All ten records (numbered 0-9) have been correctly parsed out of the page.
The dates and titles are good (although we might later want to refine the titles by moving the citation information into another field).
The URLs are relative to the root of the website that hosts them rather than absolute.
There may be one or more authors, separated by semi-colons, and each author may have birth and death dates appended. Some authors are terminated with a period, some are not.
Cleaning URLs
Fixing the URLs is easy: add a Normalize URL step. There is no need to configure it: It Just Works. Click on the Play button, and all the URLs in the Results area will be transformed into absolute URLs that include the site name as well as the local path.
Cleaning authors
The authors are little more complex to deal with. Since the compound and irregular author strings we have are already useful, we will defer further work on these for now, and come back to them in the next lesson.
So we now have a complete and functional parse step, albeit one that we can refine later.
The Next task
Make sure that the Current Task: dropdown near the top of the Builder sidebar is set to next -- if it's not, then change it.
In general, a searching client will want more records than are displayed on a site's first results page. To support this, after having returned the first batch of result records, the Engine will repeatedly invoke the next and parse tasks to obtain records from subsequent pages.
For most sites, moving on to the next page of results is as simple as clicking a link, and that's the case here. Add a Click step to the new next task; click on the Select node button in that step's configuration pain, and then select the next link at the bottom of the contained page. Now hit the Play button on the Steps toolbar to verify that this step does indeed move on to the next batch of records.
Now that we have records 11-20 on screen, we can parse these using out existing task. Using the dropdown at the top of the Builder sidebar, select the parse task, and hit the Play All button on the Steps toolbar. Both the Parse by XPattern and Normalize URL steps will run, and the parsed result will be that the records in the Results are are replaced by broken-apart versions of those on this second page. (As a side-effect, the parsed-out regions of the contained page are highlighted: this can be useful when trying to work out why and XPattern is not doing what was expected.)
Refining the link
There is a problem here, though. Go back to the next task and run it again, and you will see that rather than stepping on to the next page of results, the site leaps straight to the last page.
That's because the XPath that the node selector genrated says "use the link number 9 in the table cell that contains those links", which works fine on the first page of results but not on the second, because different parts of the pages list are linked depending on where you are.
The solution is to change the XPath so that it always picks the next link. Go back to the first page of results, where you originally defined the Click step, and:
Click on the Refine xpath button in the step configuration pane.
In the popup, click on the component
a[9], which is the part of the path that specifies link number 9. (The previous components of the path explain where the relevant table cell is.)Of the three attributes of that next link that are displayed, choose Text Content, since that is the part of the link that identifies it as the right one. Check the box next to that caption.
Hit the Save button.
The XPath in the textbox is rewritten according to your modification, and now it is possible to step all the way through the result list by repeatedly invoking the next task.
Try it!
The connector for the AMNH Digital Library is now complete, at least in a primitive form. It could be used to provide searching for metasearch tools such as Masterkey. Save the connector by choosing Tools -> Connector Framework -> Save... from the menu, or using the Save button that is third from the left in the top toolbar. It's conventional to use a filename that ends with .cf -- for example, amng-diglib.cf
In the next session, we will refine this connector.
Refining the AMNH connector
We now want to refine the connector that we made for the AMNH digital library. There are two improvements that we might wish to make: supporting advanced search (i.e. searching specifically for an author or title); and cleaning the parsed data more fully. We will consider each of these in turn.
Advanced search
We noticed earlier that the AMNH site has an Advanced Search page. We can use this to make field-specific searching available to clients -- title, author and subject. (The site also supports searching for series, but the Builder does not have a search parameter for that, so we can't make use of it.)
To take advantage of the Advanced Search page, we'll make a second search task -- one that uses the title, author and subject arguments rather than the keyword argument. Once both search tasks are in place, we'll be able to tell which is which, when we pull down the Current Task dropdown, because one will be called search (keyword) and the other will be called search (title, author, subject) -- the Builder knows which parameters each task uses and, names the task accordingly.
To create the new task, click on the Add Task button -- the large plus sign in the toolar at the top of the Builder sidebar. From the Add Task browser, double-click on search (or click on it once, then hit the Add button at the bottom of the Task browser). We need to add some sample parameters for testing, so in the Test Arguments area of the new task, let's set title to relationships, author to colbert and subject to dinosaurs. Now we're ready to start adding steps.
As before, we'll start by having the Builder navigate to the search page. Add an Open URL step to the new task, and set the Constant Location to http://digitallibrary.amnh.org/dspace/advanced-search.
The next part of the process is to populate the search form with the title, author and subject parts of the query. This can be awkward to do in search-pages like this one, where the choice of which fields to search is not statically determined but must be made by selecting from dropdowns on the search page. But in this case it's not so bad because there are three search fields available: we can set the dropdowns to constant values and use them to implement the three query parameters. If there were fewer search fields available, we would need to use conditional logic to determine at run time what selections to make from the dropdowns that control them.
Let's start by fixing the first dropdown to specify a title search. Add a Set form value step, hit the Select node button in the step configuration pane, and then click on the first of the three field-name dropdowns in the search page. When you do this, the Form field to populate field in the step configuration pane is filled in, and the dropdown itself opens up to offer the list of options. From this list, click on Title, and the step configuration pane's Populate with constant field is also filled in. Now test that the step works by manually changing that dropdown to one of its other values, then hitting the Play button to revert it to Title.
Next we need to set the value of the title argument into the form. Add another Set form value step, hit the Select node button in the step configuration pane, and then click on the first of the three entry boxes on the AMNH search page, the one next to the dropdown that we've set to Title. Now, in the step configuration pane, go to the Populate with task argument dropdown and choose title. Click on the Play button to verify that this step does indeed set the appropriate value.
What you have done for the title parameter in the Advanced Search page's first search field, you can now do for the author and subject parameters in the other two fields. Go ahead: add two more pairs of Set form value steps, and test them. (Somewhat confusingly, the value that the AMNH Digital Library's Advance Search page uses for field-selection dropdown when it's set to "Subject" is keyword. Don't worry, you didn't make a mistake.)
Finally, we can submit the search form. This is done exactly the same as for the simple search: add a Click action, Select node and hit the search form's Search button.
Test the new task using the Play button, and a single record should be found. This can be parsed using the existing parse step.
Tidying up the titles
The author strings that we extracted with the XPattern parser are rather ugly, and we can usefully do more work on them.
To get set up for this work, return to the original search (keyword) task, and hit the Play All button to re-do the search that finds 85 hits. Return to the parse task, and re-run it to get a set of results into the Builder.
Now we can get to work.
Splitting and cleaning author names
The first thing to do is split the author strings apart into separate authors: this is useful because when multiple values are returned separately rather than as part of a glued-together string, they can be used in facet lists.
Add a Split result step, and configure it as follows:
In the Result list dropdown, select
results.Set Result to transform to
author.Set the Regular expression to
;\s*(semicolon, backslash, lowercase letter 's', asterisk). This matches a literal semicolon followed by any number of spaces, tabs, etc.Set Result to set to
author, so that the split values will replace the existing author string. (Alternatively, they could be copied into a separate field.)
Running this step does not change the single authors at all, but splits compound author strings like "Brown, Barnum.; Schlaikjer, Erich Maren, 1905-" into multiple authors.
Removing trailing periods
We see that some author names have terminating periods, while others do not -- for example, in the field that was split in the previous step, "Brown, Barnum." ends with a period, while "Schlaikjer, Erich Maren, 1905-" does not. We can tidy this up with a Transform result step: add the step, set the Result list, Result to transform and Result to set as with the previous step (results, author, author), and set the Regular expression to \.$ (backslash, period, dollar). This matches a period at the end of a value only. Leave the Replace with field blank, since we want to replace the trailing period with nothing. Press the Play button to check that this step does indeed remove the period from the end of "Brown, Barnum.".
Removing birth and death dates
We now see that some of the author names have birth dates, or both birth-and-death dates, after them, whereas others do not. For example, the fourth record has three authors, Osborn, Henry Fairfield, 1857-1935, Brown, Barnum, and Lull, Richard Swann, 1867-. To remove these dates, we use a regular expression that matches a comma, followed by zero or more whitespace characters, then any number of digits and minus signs at the end of the string.
Add another Transform result step, as before with Result list set to results, Result to transform set to author and Result to set set to author. Set the Regular expression to ,\s*[0-9-]+$ and leave the Replace with string empty.
Press the Play button, and watch all the dates disappear from the ends of the author names.
Reversing the "Last name, First name" format
Now we have author names like Osborn, Henry Fairfield, Brown, Barnum, and Lull, Richard Swann. These are all in a consistent format within the AMNH Digital Library database, but normalised names in this last name, first name format are generall unusual, and so client software that uses these names to generate facet lists will not recognise that Osborn, Henry Fairfield in this database is the same author as Henry Fairfield Osborn in another. So in order to make our connector a better citizen in the metasearching world, we'll finish up by switching the names into the more common form.
For this, we will use yet another Transform result step on the author field (so set up Result list, Result to transform and Result to set as before). This time, we need a more sophisticated regular expression that captures both the surname and the forenames separately. Set Regular expression to (.*),\s*(.*). This matches and captures any sequence of characters, followed by a comma and zero or more spaces, followed by another sequence of any characters, which is also captured. Set Replace with to $2 $1, which simply emits the two captured substrings in reverse order.
Hit the Play button: all the author names are converted into conventional form.
Putting it together
Now that the parse task is complete, you can test it as a whole. Use the next task to step on to hits 11-20, then go back to the parse task, and hit the Play All button. All of the URLs and authors should appear correctly. in the Results area.
Is Javascript necessary?
Thanks to the popularization of unobtrusive javascript, progressive enhancement and graceful degradation as web development best practices, there is often the possibility that one can operate a web application with JavaScript entirely disabled. This is definitely a win as far as creating a connector is concerned: fewer files to load, fewer HTTP connections, less processing, etc.
When first evaluating a web site you plan to build a connector for, try operating it without JavaScript. It's important to check this early on: pages can offer quite different markup for their non-JavaScript versions and this will change the approach you take to developing the connector and the paths to the various elements within the site.
Rather than going back and forth to your browser preferences you can toggle JavaScript off and on by using the convenient green button with .js on it at the bottom right corner of any Firefox instance running the Builder. Upon determining where in the process to disable scripting, Set preference steps can be inserted to that effect.
Sites without hit counts
One of the most ubiquitous steps in any connector is "extract value", most frequently used to pick up the number of "hits" associated with an executed search. Without exception, this step must be included whenever result hit counts are available from a website.
Occasionally, however, websites do not provide hit counts for searches. Although a specific count is required for complete processing, we have coded a work-around for "no hit" situations, so that connector authors do not have to create hit counts out of thin air when target sites do not provide them.
Simply put, if there is no identifiable results hit count on the website, just ignore that step -- our software will provide an internal value so the connector will function properly.
The requirement for covering a "zero hits" situation -- where authors must provide a count of "0" for searches yielding no results at all -- is still valid, even if the site provides no hit counts for successful searches. Without including appropriate "zero hits" steps in the connector, it will fail nightly testing in the repository.
XPath refinement (making "Next" work on the 2nd page)
To use click, extract value, and some other steps, you need to choose a target for the action. When you click select node and move your mouse around the page, elements are highlighted with a dashed outline. The name of the element is also noted at the top of the window.
<a href="http://link/"><b>LINK!</b></a>Knowing which element is selected can be very helpful in circumstances where the exact same area of the page is acted on by multiple tags, such as above where the link is also bold. Here you would want to be sure to get the <a> tag that has the href attribute with the URL and not the <b> tag that makes the link text bold. You can hit + or - to change the selection to the parent element or first child respectively, in this case + to select the parent <a>.
Once you have chosen an element, you may notice that the step configuration is updated with a value delimited by slashes that looks sort of like the disk path to a file. This is an XPath.
XPaths
XPath (formally, the XML Path Language) is a standard way to describe the location of an element or elements in an XML document or in something quite similar to XML, such as the HTML of which web pages are comprised. For example, in the the HTML document below, an XPath to the link (<a> element) would be: /html/body/p/a
<html>
  <body id="ident">
    <p>Second paragraph!</p>
    <p class="classy">Second paragraph!</p>
    <p>Third paragraph!  This time <a href="http://place/">with a link</a></p>
  </body>
</html>
This literally is a path: it starts at the root of the document and traces the nested elements from the outside in. To choose the second paragraph we would start with something like: /html/body/p. This is a perfectly valid XPath but would match all three paragraphs. The Builder only works with paths that match exactly one element. To specify the second paragraph you can add a count: /html/body/p[2]. This count is inherently brittle as what today is the 24th link in the 7th div tag could be changed by any number of different edits.
The Builder avoids use of counts and keeps paths short by including class attribute values to further differentiate the elements, and by starting from the closest element with a unique id rather than at the top of the document. It would describe the second paragraph here as: id("ident")/p{@class="classy"].
The Builder will also abbreviate longer paths with unique combinations of elements with a // indicating any number of intervening nodes. For example, //p/a would match any link inside of a paragraph, regardless of how many other elements it was nested within.
A note on frames
When an element is selected within a frame document, the connector also needs to store the path to the frame that contains it and potentially many layers of nested frames. This is represented internally and in the connector's XML file as a list of separate paths. To keep the interface compact and still handle arbitrarily many frames we use the non XPath string %% to delimit frame paths and list them all in the same field.
XPath Refinement
Sometimes the path provided by the node selector will fall back on a count that proves unreliable as it changes between searches. The most common case we've run into is the link to choose the next page of search results. Frequently the links to separate pages are right alongside the "Next" and "Previous" links like so:
<td>
  <a href="...">Previous</a>
  <a href="...">1</a>
  <a href="...">2</a>
  <a href="...">3</a>
  <a href="...">Next</a>
</td>
Here the next link is td/a[5] since it's the fifth link. But another search may have more result pages. Or less.
<td>
  <a href="...">Previous</a>
  <a href="...">1</a>
  <a href="...">2</a>
  <a href="...">3</a>
  <a href="...">4</a>
  <a href="...">Next</a>
</td>
Now the fifth link is to the fourth result page and the next step would keep sending the connector to the same page, causing a series of duplicate results. To get around this, we need to replace the element count with something more reliable. Rather than editing the XPath manually there is a Refine XPath button that brings up a window with a tool to assist in this.
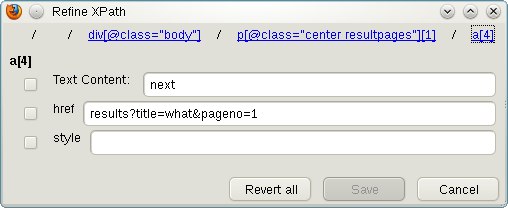
Here you can click any component of the XPath and stipulate strings that the attributes and text content must contain. For the pictured example I would check "Text Content", which would give me an xpath that refers to the link as a[contains(text(), "next")] instead of a[4]. The new pattern will then select the link containing the word "next" rather than the fourth link. The XPath refinement tool will only allow an XPath to be saved if it matches exactly one element.
Further reading
The XPaths generated by the Builder barely scratch the surface of the expressiveness possible with the language. The specification is the most complete resource and various tutorials exist on the web. We will also be updating this documentation with techniques for dealing with common issues as we encounter them, such as referring to sibling elements when there are only numbered links to pages of search results and no dedicated "Next" button or link.
Finding the next page of results when there is no Next Page button
Sometimes web sites puts a list of page numbers in a search result instead of a easy clickable Next button.
One technique would be if we can referrer to the active list element and by finding the first sibling after that. An example:
<ul id="ul">
  <li class="selected">1<li>
  <li><a href>2</a><li>
  <li><a href>3</a><li>
  <li><a href>4</a><li>
</ul>
An xpath expression to get next page <A> element would be:
id("ul")/li[class="selected"]/following-sibling::li[1]/a
Debugging Connectors
This page is a general collection of tips and tricks for debugging connectors.
Debugging in the Builder
If you have read the preceding sections in this part of the Guide, you will already know many of the things that CAN go wrong. Here are some of the things we do to test and fix connectors.
Run each task several times; ideally with different input. Try different searches. Make sure the parse function grabs all records.
Make sure that page load detection is set up correctly for Click steps, etc. If you are clicking on a button or link that causes a change to the page without loading a NEW page, typically, 'wait for page load' should be un-checked. Otherwise, the Builder will wait a long time for a page load that never happens.
Some pages don't work well with one or the other page load strategy. Experiment.
Verify that the Next task works as intended -- be sure to run it more than once; a very common problem is a Next task that hops back and forth between the first two pages because the number of links in the navigation area changes. A simple qualification to the XPath for the Next button usually does the trick -- can be done with the Refine Xpath button.
Make sure that your Connector handles a zero hit situation. Test it with input that is guaranteed to produce no hits. Often, alt-steps are required to handle zero hit scenarios.
Debugging in the Engine
Index Data's Connector Repository allows connectors to be tested against the Connector Engine -- either directly from the Builder, using the 'test connector' button in the Connector toolbar, or by uploading the connector first, then clicking on the Test link in the connector's details page. Testing directly in the Builder is a nice way to avoid getting a whole bunch of versions of the same connector while you try to sort out -- in either case, the Connector is exercised in the live production environment, where for various reasons, results may differ from what you see in your browser.
Below is an example of the output from a successful test.
The automated test is designed to catch as many as possible of the issues that might lead to problems in production use. In particular, the connector is tested using the test data that is contained in the connector, to see if it can return a positive hitcount, and a set of records. An attempt is made to exercise the Next task, and the results are analyzed to look for duplicate records, a typical sign of a problem connector (you should look at the output of the duplicate check -- because many fields are legitimately duplicated, the software won't fail the connector just for duplicated data elements). The connector is also tested with an input that typically results in zero hits, to verify that this situation is handled correctly.
If a connector fails, it is flagged prominently by the attractive red color:
At this point, different information is available to support debugging the connector, including diagnostic information about the engine, and a snapshot of the page the Connector Engine was 'looking at' when the connector failed. Analysis and trial-and-error will usually enable you to make the connector work based on this information.
Working with XML
Although the Connector Platform is intended to work with websites, it can also be used with XML-based web services. With a few caveats, those ought to work the same way as a regular web site.
Usually it makes sense to build the complete URL to the web service, instead of going through an input page and setting form values. Simple keyword searches can be done the usual way, but this is where the fullquery step really shines, especially if the site supports a more complex query language.
The way thos done has changed several times. Earlier the goto-URL step had a checkbox to load raw XML, but that was deprecated long time ago, when we got the HttpClient step that did the same. Even that is deprecated now (as of version 25.0), now we have two separate steps: Http for fetching the result as plain text, and RenderXml for rendering XML onto the screen, where XPattern and other tools can reach it. It may be necessary to do some nasty transforms, maybe even decode/encode steps, before (or instead of) rendering the XML.
Normally you would build the parse task as usual. You can use extract_Xpattern, and even create a pattern by clicking on the elements you want. Remember to set the hit area to something that exists in the result document, like /searchResult, or the root node /
For the Next task, you may need to modify the previously-used URL, possibly adding a start-record-number argument. You may want to store it in $.session. In some cases the resulting XML contains a link to the next page, which makes life easier.
When you need to define the hit-area for XPattern, or use the Extract-Value step, you need to give an XPath to point to the node. Normally this can be done by pointing and clicking, but in case not, remember that
- XPath is case sensitive when working with XML documents
- XPath may need some namespace declarations
Some details about the XPatterns
- Unlike the XPath, the XPattern is not case sensitive.
- The XPattern does not care about namespaces at all. It just uses the tag names and ignores all namespace prefixes.
It is theoretically possible that these restrictions make some XML formats harder to parse. In practice it is extremely rare to meet XML that has identical tags that only differ by namespaces, or by upper/lowercase letters. If you run into such, you may need to extend your XPattern to match some nearby nodes.
Returning XML fragments
Normally you would parse data out of an XML document, but occasionally it is so nicely organized that you don't need to do anything more than return the fragment as is. The CF engine has a special bit of code for this purpose: If the variablenameendsinxml, itisconsideredtobeXMLandwillbeusedasis.Ifthevariable does not end in _xml, it is considered a string, and all xml-specific characters get duly escaped.
CF-Zserver will strip the _xml suffix when it does this processing.
MarcXML
An extreme example of passing XML comes when a web API can return a complete MarcXML record. This should be parsed out with a XPattern not unlike this:
record $marcxml_xml -xml -whitespace { ... }Note that we need the -xml modifier to get the whole XML content of the node, and the -whitespace modifier, since the leader field may well contain repeated spaces that would otherwise get merged into one, moving things to wrong positions.
When the client requests a Marc record from the cf-zserver, it will first see if we have a MarcXML field, and in that case, return it as is. If not, it will build a Marc record from the CF fields as well as it can.
This feature should only be used with sites that return proper and correct MarcXML records.
OpacXML
Likewise, if the client requests an Opac record, the cf-zserver will attempt to build one. If there is one or more holdingxml_xml fields, these are copied into
the <holdings> section of the opacRecord. If not, such holdings are generated from the $item groups.
The _xml suffix, MarcXML and holdingXml trickery was introduced in version 2.29
Facets
As something new (in version 25.0), the CF can now also deal with facets. This is done in the search task. Besides the query-related parameters, it can also receive a facet request in $.input.facets . And it can return facet results in its $.output.facets, next to the hit count. The names of the facets are defined in the templates, but normally we will have something like
- author
- subject
- year
- publisher
- format
- language
Naturally you can define what ever facets the site support, the system allows arbitrary names for them. The capability flags can not be defined on the fly, they are limited to this list.
Facet request
NOTE - the facet request is only available with the fullquery!
Most websites that support facets will not have much in the way of controlling what facets to show. In such cases there is no need to worry about parsing the facet request, it may be easier just to parse and return them all.
On the other hand, most API connectors require extra parameters for requesting facets, there you need to transform the request into a form the API requires. Typically you need to tell which facets you need, and how many terms you want to see for that facet.
"fullquery" : ...
"facets" : {
    "year": { "limit":15 },
    "author": { "limit":5, "sortorder":0, "terms":[ {"term":"foo", "count":3} ]},
}
The limit parameter tells us how many facet terms we want to get out. Sortorder is used very rarely, and the rest practically never. They all are optional.
You can access these directly as $.input.facets.year.limit
Facet response
Once you have facets on the screen, you need to parse them. This is similar to parsing regular hits, often the easy way is to use XPattern. It may make sense to use several XPattern steps, one for each facet type. Remember to set all but the first to 'append', so they will not clear the facets found in the earlier step. You may want to allow for the case that there are no facets of the given kind, either by unchecking the "fail if nothing found box" (to be added in version 25.something), or with the help of an alternative step or a try-catch structure, or some other fancy way.
The resulting facets should go into $.output.facets, something like this:
...
"facets" : {
    "author" : [
        { "term": "Kernighan", "count" : "17" },
        { "term": "Ritchie", "count" : "36" },
    ],
    "year" : [
        { "term": "1978", "count" : "78" },
        { "term": "1999", "count" : "99" },
    ],
    "subject": []
}
But the system is flexible, if you have several XPattern steps, each will provide its own facets section, which will be appended, so you get facets[0] and facets[1], each with its one facet.
The most logical way to create output facets is to use the XPattern. Set the output to $.ouput.facets, and have a group like `tr + { ( td + $term : td + count) + year}`
If you need to build the facets by hand, the structure is a tad tedious to create, so it is probably better to have a XPattern parsing some constant text just to get the first facet, and then populate it with stuff like create container $.output.facets[0] / mynewfacet and set things with constant $.output.facets[0].mynewfacet[0].term. If you have a count, you can set it the same way. If omitted, it defaults to zero, which is a valid result, telling that we have a facet, but do not know the count for it.
The facet stuff appeared in version 2.25.1
XPattern
Or-bags
Or-bag is a term we (Sebastian?) coined for a construct like
(b title∣iauthor | u $publisher)+
which means that those things can occur in any order, and repeat as they like. Often we can add | ANY to the end of it to skip anything not explicitly mentioned - as long as there is some more pattern to match after the or-bag, to make sure we will not globber the rest of the page into this one hit.
One good example is
tbody {
  (   TR { td [ /Title/ ]
          : td $title }
    | TR { td [ /Author/ ]
          : td $author }
    | TR { td [ /Publisher/ ]
          : td $publisher }
    | TR { td
          : td $description }
  ) +
}
Each time the () match, it takes one TR, and puts data into the right $variable. Since it can repeat, it goes through the whole table. It does not matter in what order the things are on the page, but the order in the or-bag can make a difference, the more specific alternatives should be listed first, and the general catch-alls in the end.
Advanced search pages
This article is about using advanced search pages, boolean operators, and other difficult things. First a word of warning: This may get a bit abstract at times. For the first, we need to talk about the user's query, without knowing exactly what he is searching for, or how. For the second, we need to talk about putting those terms into a search page, without knowing how the page will look like.
To keep things a little bit down to earth, I assume here that
- We need to make a connector that supports some boolean operators (AND/OR/NOT).
- We can not make a "simple" fullquery connector for this, because the site does not support a full-blown query language
- We have a web site that offers an "advanced search" page with some kind of support for boolean operators, and multiple input fields.
The stuff here makes use of several advanced steps. If you are not familiar with them, you should probably take a look at:
Typical advanced search task
The following is an overview of things that might well happen in a typical search task. No single connector will look exactly like this, but it should give some kind of picture of what this is all about. Most simple steps are omitted, this list covers only the highlights. We get into the gory details later.
- Get to the advanced search page. Hopefully you can just go to an URL, but in the worst case you may have to navigate through the site, and click a few times on a link to get more input lines...
- Use Fullquerylimit to remove year limits from the fullquery, and put them on the search form.
- Use Listquery to convert the fullquery into a listquery structure
- Use Listqueryelement to extract the first element(s) from the listquery structure. Use Map to translate the field name into a suitable name and select that from the pull-down. Use Fullquery to map the term(s) into a query, and fill that into the input field.
- Repeat the process as many times as there are input lines on the search form. For all but the first line, use Map to translate the boolean operator to what the site understands, and set that in its pull-down.
How to build one
Preliminaries
The first thing to do is to see what kind of advanced search page we have. That is explained at Looking at an advanced search page
If the page looks like you need to take special care of years or other limits, do that first.
Listquery
Next you need to convert the fullquery into a listquery. This is done with the Listquery step. It is not very complex, but there is one detail to consider.
If your search page does not accept any kind of query language in the input fields, you can only put one term in each. That means that there is a hard limit to how many terms you can handle. You should put that limit in the configuration of the step, so the process can fail already at this point if there are too many terms.
Listqueryelement sequence
You need to have a sequence of steps for each input line on the form. It is probably easiest to write the stuff for the first set first, and when it works, copy the whole sequence for the second input, add the stuff for the operator, and when that works, copy the sequence for the rest of the fields. Remember to edit all references to point to the right line in the form!
The sequence starts with a Listqueryelement step. There are some decisions to be made in configuring it:
- If the site only allows one term in each input, tell the step to return only one. If it allows a sub-query, tell it to return all that match.
- If there is a pull-down to select the index to search, tell the step to return the first available field. If you need to put authors in one place, and titles in another, ask for them spefically.
Index name
Most likely the site has a pull-down, where some values map to some of our well-known index names (keyword, title, author, etc.). You should use a Map step to translate those into some of the values to set in the pull-down. To see the values, view source on the page, and look for a sequence of <option> tags.
Search term
Even if the site does not support more than one search term in each input, it makes sense to use a Fullquery step to convert the string. That way, you can handle truncation, phrases, etc. Since you are dealing with one field only, there is no need to fill anything on the fields tab.
If the site supports boolean operators inside the input fields, configure them accordingly. You can not use the (XX and YY) form, because we are no longer dealing with nested stuff, just tell what words to put in between the terms. Watch out with white space, you probably need some on each side of the operator, so you get "war and peace" instead of "warandpeace".
Operator
In all but the first line, you need to fill in the operator to connect this line with the previous one. In some rare cases you can just use the operator as it is in the listquery, but most often you need to Map it to something the site understands. This mapping can also be used to trigger an error for unsupported operators. You should always take the operator from the first (possibly only) element in the list. It is accessible as $.temp.elements[0].op_, which is what you should put in the input of the Map step. You can use something simpler to put the resulting operator name, for example _$.temp.op, which you can then select in the proper pull-down.
Testing it
These steps are tricky to test. You probably need to hand-craft complex fullqueries to start from, with exactly those fields and operators you wish to support. (But test also those you do not support, to see that they fail with decent error messages. The Assert step can come in handy here. It is easiest to edit the fullquery structures in a text editor, where you can allow them to span many lines, and indent things so you can see what is going on. You should be able to paste such a thing into the one-line test argument field. There are some simple starting points in the examples tab of the fullquery step.
With this kind of complex connector, it may make sense to define a few test cases in the connector for future testing.
Years and other limits
Often when writing a fullquery connector, there are fields that will not behave like the rest. A typical example is start/end years. Often they go in a separate URL parameter http://.../search.cgi?query=fire+and+water&startyear=2000&endyear=2009 Or the search form has one input for a complex query, and a separate input for a year range.
Of course the same can apply to other kind of limiting fields (sub-databases, material types, etc), but since years are the most common, that's what I talk about here.
The solution is to use the Fullquerylimit step to remove the year limits from the fullquery parameter, process them separately, and to process the (remaining) fullquery afterwards.
Fullquerylimit
The Fullquerylimit step extracts the years (or what ever fields you tell it to extract) from the fullquery. You can configure the Fullquerylimit step to return a range of years, even if the user asked for only one.
The step returns the years in the same format as a Listquery, as a list of one or two listquery elements. You can feed this list to a fullquery step to translate it, or you can access them directly as .temp.yearlimit[0].termand.temp.yearlimit[1].term. This is deprecated, since it may go wrong with queries that only specify one endpoint. Use the named endpoints (below) instead!
There is also a checkbox to put the end limits directly in named .variables.Thenameisconstructedfromtheoutput.variable name, typically .temp.startyearand.temp.endyear. This is the recommended way in case you just need to get the end points.
Using Fullquery for years
The Fullquery step can translate a single year or a year range into a suitable search string. Since you already know you are only dealing with years, there is no need to configure the various fields in the field tab, just delete them all. In the ranges tab, you can configure how they should be expressed, for example before XX or [XX-YY]. The XX and YY are start and end years, as usual.
Simplequery
The simplequery step can also make $.temp.startyear_ and _$.temp.endyear. It can combine several terms in the query into one range, and fail with an informative message if that is not possible.
The rest of the query
Now that the years are taken care of, you can proceed with the rest of the query. If you happen to have another limiting field, you can repeat the process. Your original fullquery parameter has now been simplified so that it no longer contains those years, so you can use a regular fullquery step to produce your query string, or do more advanced stuff with listquery etc.
Analysing an advanced search page
The first thing to do is to see what kind of advanced search page we have. There are many possibilities, but we can try to classify them according to some simple features.
How to specify search indexes
- Fixed fields for authors, titles, etc. If the site does not support booleans inside the field (see below), you should probably not even try an advanced connector, but make one with old-fashioned keyword/author/title inputs. If some (but not all) fields support truncation, phrases, or ranges, you may want to start with a Simplequery step, and then proceed with the simple $.variables as in the old-fashioned way.
- Multiple fields, each with a pull-down to select the field. This is a good indication of using a listquery and a sequence of listqueryelements.
- One field, with some kind of codes to specify fields. This points towards a regular fullquery connector.
- If the site has fields for "all of these words", "any of these words", or "none of these words", that points towards a Any/All query step.
Boolean operators
- Does the page have pull-downs to choose the boolean operator to apply between the lines? If so, that points towards a listqueryelement stuff
- Does the site support using boolean operators inside a field? If yes, you only need one input field for all author terms, one for titles, etc. If no, you need more input fields, or can not handle so complex terms. This is often explained in some sort of help page.
- It is probably worth while to check that the booleans actually work, no matter what the help pages say. For example, search for war, then for peace, then for war and peace, war or peace, and war not peace. See if the number of hits makes some kind of sense. When searching with or, you should get more hits than with and, and both numbers should have some resemblance to the number of hits for the individual words.
- See if the site supports google-like search terms, with +word meaning that the word should exist in the record, and -word meaning that it should not. These can be handled with a fullquery step, but they are hard to mix with regular boolean operators, and not all sites get them right. See what it does with meaningful queries like +war and +peace (any different from same without the +'s?), and strange ones like +war or -peace (what ever that is supposed to mean).
Other details
- The help text (on the page, or linked from it) may tell you if the site supports truncation at the end of the word, beginning of the word, or not at all. You need this to configure the Fullquery steps.
- Likewise, you should check if the site supports phrase search, often by enclosing the term in double quotes. Again, this goes into the configuration of the many fullquery steps.
- Check also if there is a simple search page, and if that supports a better query language.
Search URL
- See if you can build a search URL instead of filling in values. Look at the URL produced by the simple search page, as well as the advanced search. Some times it is possible to combine parameters from both, typically the start and end years are not available in a simple page, but if you append them in the search URL, they work anyway.
Looking at an advanced search page
The first thing to do is to see what kind of advanced search page we have. There are many possibilities, but we can try to classify them according to some simple features.
How to specify search indexes
- Fixed fields for authors, titles, etc. If the site does not support booleans inside the field (see below), you should probably not even try an advanced connector, but make one with old-fashioned keyword/author/title inputs. If some (but not all) fields support truncation, phrases, or ranges, you may want to start with a Simplequery step, and then proceed with the simple $.variables as in the old-fashioned way.
- Multiple fields, each with a pull-down to select the field. This is a good indication of using a listquery and a sequence of listqueryelements.
- One field, with some kind of codes to specify fields. This points towards a regular fullquery connector.
- If the site has fields for "all of these words", "any of these words", or "none of these words", that points towards a Any/All query step.
Boolean operators
- Does the page have pull-downs to choose the boolean operator to apply between the lines? If so, that points towards a listqueryelement stuff
- Does the site support using boolean operators inside a field? If yes, you only need one input field for all author terms, one for titles, etc. If no, you need more input fields, or can not handle so complex terms. This is often explained in some sort of help page.
- It is probably worth while to check that the booleans actually work, no matter what the help pages say. For example, search for war, then for peace, then for war and peace, war or peace, and war not peace. See if the number of hits makes some kind of sense. When searching with or, you should get more hits than with and, and both numbers should have some resemblance to the number of hits for the individual words.
- See if the site supports google-like search terms, with +word meaning that the word should exist in the record, and -word meaning that it should not. These can be handled with a fullquery step, but they are hard to mix with regular boolean operators, and not all sites get them right. See what it does with meaningful queries like +war and +peace (any different from same without the +'s?), and strange ones like +war or -peace (what ever that is supposed to mean).
Other details
- The help text (on the page, or linked from it) may tell you if the site supports truncation at the end of the word, beginning of the word, or not at all. You need this to configure the Fullquery steps.
- Likewise, you should check if the site supports phrase search, often by enclosing the term in double quotes. Again, this goes into the configuration of the many fullquery steps.
- Check also if there is a simple search page, and if that supports a better query language.
Search URL
- See if you can build a search URL instead of filling in values. Look at the URL produced by the simple search page, as well as the advanced search. Some times it is possible to combine parameters from both, typically the start and end years are not available in a simple page, but if you append them in the search URL, they work anyway.
Cproxy
The cproxy makes it possible for the end user to click on a link in the results, and see the page, with the proper authentication etc taken care of.
The basic process is as follows:
- The proxy-url step creates a session file, which contains all the cookies, authentication tokens, and what else is needed for the proxying
- The proxy-url step rewrites the result links to point to the cproxy. Each link has a session number in it, that corresponds to the session file.
- The user clicks on such a link
- The link points to pur cproxy
- The cproxy reads the session file, sets up a request to the website, with all the necessary authentication, cookies, etc.
- The cproxy reads the resulting page, and rewrites all links on it to point to the same session in the cproxy.
The reality is much more complex, but this is the basic idea.
Proxified URL
A proxified URL looks like this:
http://cproxy.id.com/prefix/999999/www.indexdata.com/software?foo=bar
- cproxy.id.com is the name of the machine that runs our cproxy. It needs to be the same machine that runs the CF engine, or at least they need to share a file system, since the session files are written by the CF and need to be read by the cproxy. This is configured in /etc/cf-proxy/cproxy.
- prefix is a configured piece of text, stays the same for one instance, but can be useful in load-balanced setups, etc. Also configured in /etc/cf-proxy/cproxy.
- 999999 is the session number. Normally the cproxy picks up by random.
- The rest of the URL is the original URL.
Debugging cproxy issues
This section contains various tips and tricks for debugging problems with the proxifying the results. The web is full of really weird sites, and not all of them work well with the cproxy. Bear in mind that the cproxy can never be perfect, there will always be sites that just will not work with it, or that get the basic text out, but look ugly.
Classifying the problem
The first thing is to figure out what kind of problem we have. It could be anything from a blank page or an error message, to authentication problems, to more or less ugly page, or links that don't work.
Usually the problems are consistent, but it pays off to mess with the page for a little while, to see if its behavior changes, for example after clicking on links, displaying/hiding elements, coming back through another link from the same result set, etc.
Symptoms
Here is a small selection of the more common symptoms we have seen. The list is not at all complete, and we hope to improve it over time.
Nothing shows
Try view source - is there anything at all? Check firebug, any redirects? Look at the headers of those.
Login page or a "not authorized" page
This indicates some kind of authentication issue. Verify first that you can log in manually with the credentials you have. If that doesn't work, nothing in the cproxy is going to fix that!
Very often this kind of problems are caused with cookie problems. Use firebug to look at the first dozen (or so) requests, typically a long chain of redirects that ends at the first 200-OK response. Try the cookie analysis tool (see below)
Missing style sheet
The site looks very plain, black text on white background, links in blue. The beginnign of the page contains strange elements (that should be in the top and/or left menu sections), but the content itself seems to about right, when you find it.
View source, search for css. There may be more than one. If you find a proper tag in the head section, with rel="stylesheet", look at its URL. Properly proxified? Try to open that in a new tab. Does it load? Is there javascript that messes with the style? Does Firebug show the css loading?
Ugly page
More often than not, this is caused by some style sheets missing (see above). Occasionally also javascript problems can mess up the layout.
Site fails the first time, works on reload
This could be a matter of some elements coming from the cache on the secod try, but from the server the first time. Together with these elements can come cookies, which may mess up with things. We have seen this with requests to xajax.gooleapis.com which got sent too many cookies, and helpfully tried to clear those it didn't like. The solution to this is to use the advanced functions in the proxy-url step, and add OmitCookies lines for the sites that need such.
Approaches
There are various ways to approach a badly proxified site. Many of them you can do on your browser, some require access to the cproxy server to inspect the session files, dumps, and logs.
View source
This is one of the quickest and easiest things to check, almost no matter what the problem is. The source often contains useful comments, you can see links to scripts and style sheets, etc.
Firebug
This shows what the browser loads. Especially good for seeing redirects, and requests that fail for some reason.
cproxydebug
cproxy can produce a lot of debug output on its own. This is triggered by adding the magic word cproxydebug in the URL, for example http://cproxy.indexdata.com/some/prefix/999999/cproxydebug/www.some.site.com/page... Instead of showing the proxified page, this will show you how the process went along, together with the source for the page. This is useful to see the headers (both request and response) as they were seen at the cproxy - beyond any load balancers and proxies that may be between the browser and cproxy. It also tells what the proxy does to the cookies. The actual rewriting of the content happens in a different module, so it is not covered by this.
It is possible to add various modifiers after the cproxydebug word
- cproxydebug-verbose - shows even more details
- cproxydebug-nomove - shows only the processing of the request, without passing it on
- cproxydebug-keepcontent - keeps the content-type, so you may be able to see the page after the debug output.
- cproxydebug-dump - create a dump directory on the server. This will contain one file for every request in the session, with output similar to -verbose, as well as a few other helpful files. See below
- cproxydebug-cookie - This reads the dump files produced earlier, and tries to analyze what happens to the cookies. See below.
More than one modifier can be combined in the same request, for example cproxydebug-verbose-nomove.
These cproxydebug tricks require some understanding of the internals of the cproxy, and are likely to confuse a beginner. You have been warned! (but take a look anyway)
cproxydebug-dump
This produces a dump directory on the server. Once the cproxy sees a dump directory, it will store a file for every request it sees. There will also be a symlink __start, to point you to the first file in the sequence, and a file called _cookietrace that contains a few lines for each request, mostly about cookies. These dump dirs can be large, it is not unheard that a web page consists of 100 requests. But if you really need to know what is going on with the page, this is the way: Make a new search, copy the link, add the cproxydebug-dump (maybe also -nomove if the site is slow), and then try the link without the cproxydebug. Once the page is shown, go to the server, and look in the cf directory (typically /tmp) for a directory like cf.999999.dump.
cproxydebug-cookie
Once you have produced stuff in the dump direcory, you can get a simple analysis of the cookies with cproxydebug-cookie. This lists each request in turn, and all cookies coming and going there. It may also be useful to see the chain of redirect requests, and some other details.
Content connectors
The CF does not live in a vacuum, usually it is a part of a complex search system. In such system we may have targets we access through CF, and for others we use Z39.50 or SRU. Those targets return fulltext links like any other. And if the user clicks on such a link, and does not happen to be on an ip-authenticated address, she will end up in a dialog asking for username and password. More often than not, the user will have not idea of those.
So, to solve that problem, we added code into other components, most notably Metaproxy and Service Proxy, as if they had their own proxy-url steps. Now the links point to our cproxy, but that does not help us much, we still do not have a properly logged-in session - actually, no session at all. The solution to that was that otehr other tools write down some parameters to the cproxy, most notably the name of a content connector. Then cproxy invokes CF with this content connector, it does what ever is necessary to log in to the site, and establishes the session, so that cproxy can then process those links as if they had come from a regular CF target. If this sounds complex, it is because this is complex.
So, we need content connectors. How to build one? That is not too difficult, it is a connector like any other, except that
- It needs init task and (more often than not) do a proper login, entering username and password to a form
- When the login succeeds, the init task must run a proxy-url step to save the session state.
- There has to be a search task. It does not need to do anything, just accept a keyword search (or a fullquery), and return zero hits. But it needs to be there, for historical reasons.
Steps
Accept SSL
Will attempt an HTTPS connection with the provided URL and will make an exception for the otherwise invalid certificate it provides. The host and port need to be entered explicitly in order to give the context for the exception.
Also required is which warning you're overriding:
ERROR_UNTRUSTED - not signed by a recognized certificate authority
ERROR_MISMATCH - certificate doesn't match the domain
ERROR_TIME - expired
When running under XULRunner 10 the override needs to match the error exactly, this requirement is relaxed before XULRunner 24.
Specify a fingerprint
The fingerprint field is optional but recommended. It takes the fingerprint of the certificate's public key, calculated using the SHA1 algorithm as a string of hexidecimal octets. You can find this displayed prominently in Firefox when you inspect the certificate on an HTTPS page.
Any/All query
The AnyAllQuery is a special step for splitting a listquery into up to four separate lists, suitable for websites that have input fields for
- Match all of these words
- Match any of these words
- Exclude these words
- Match exact phrase
Configuration
The configuration is simple. There is one variable specification where to take the input query, and four specifications for where to put the resulting lists. Each of them also has a checkbox telling if this should be supported.
All the variables, both input and output are in the listquery format, so they may contain multiple terms.
Some queries are too complex to simplify this way. Should the step meet one of those, it fails with an informative message.
How to use it
The most simple way is to
- Use a listquery step to convert your query into a list
- Use a listqueryelement step to extract the terms that refer to keywords. Fail if anything else found.
- Use a anyallquery to extract the four lists, or as many of them as your website supports.
- Use fullquery to convert each into a string. Most likely you need a very simple fullquery step, with no field names mentioned, etc. Its main purpose is just to collect the terms.
- Put them into the suitable input fields on the form
For more advanced stuff, you could use a listqueryelement to remove year limits from the fullquery first. After the listquery step, you could do other listqueryelements (followed by their own fullqueries etc) to extract authors and titles, if they have separate simple inputs on the page. Finally you could use anyallquery to get the keyword stuff as above.
anyallquery first appeared in version 2.12
Assert
The assert step tests a condition. If this succeeds, nothing happens and execution continues. On failure, a custom error message is output, optionally tagged with one of a fixed set of error codes. Assert is useful for more detailed logging/debugging and combines with retry as an alt step to loop until a result or argument matches a desired pattern.
Click
The click step, in general, really couldn't be more simple. It just simulates a user clicking on something. Most often it's used to activate a search form, or to select a function.
Constant
"Constant" sets a specified value. This step helps to provide a default or fall-back. The name is a bit of a misnomer as it supports inline variable replacement via the {$.container.key} syntax, and even artihmetic expressions like {$.results.hits} + 1
This step can also be used for creating long values, for example SOAP requests for API connectors. There are some such values hard coded as starting points. The buttons to enable these are hidden, except when the value box is completely empty - they would be of no use afterwards, and we are short of screen space.
Delay
“Delay” causes the connector to pause for some time (specified in milliseconds) before continuing on to the next step. Normally used with a (small) constant value, but it can also be a $.variable.
Encode/Decode
Can convert stored data to and from a variety of encodings. Currently:
- JSON
- JavaScript Object Notation, a string representation of a JavaScript object.
Extract chronology
The Extract chronology step makes an attempt at figuring out the volume, issue, start-page, end-page and date (or whatever subset is available) from a bibliographic citation. For example, given a citation like "Palaeontology 50(6):1547-1564", it will fill in the fields:
- volume = 50
- issue = 6
- page = 1547
- endpage = 1564
(and leave the date field untouched.)
It works by matching the text of the specified field against a set of patterns that have been determined to represent chronology fields, such as VOLUME(ISSUE) and startpage-endpage. Every time such a pattern matches, the matching substring is removed from the text, so that no component can match more than once. Each field, once filled in, is protected from overwriting.
The set of patterns known to this step is rather arbitrary, having been accumulated over time as we've gained experience with various citation formats. By necessity, not all possible formats are supported -- apart from anything else, different formats in use are mutually incompatible.
When this Extract chronology works, it is a very convenient shortcut. When it fails, it is generally necessary to fall back to writing a sequence of Transform result steps instead.
Extract value
"Extract value" copies a value from a document element into a variable. When you select an element the step will list all attributes and display their values. Choose which you want to extract. An additional option, "text", is given for the text content, ie. the text between tags:
<element attribute="value">text content</element>"NB: extracting text includes all nodes nested within the one you choose but it will not add spaces. So this <section><div>crammed</div><div>together</div></section> will come out as crammedtogether.
As with other steps, Extract determines which nodes to operate on based on the XPath expression you specify by choosing a node or entering one explicitly. By default it will store the chosen aspect of the first node in the document matching the specified path but this can be overidden with the options on the "advanced" tab:
follow document order will ensure that nodes are matched in the order they appear in the document rather than the order they are processed by the browser.
extract multiple nodes instructs extract to keep going rather than stopping once it finds the first match. You'll need to select "append" or "concatenate" beside the variable in order to store more than the last value.
fail if more than one match only works when extracting multiple nodes as otherwise it will stop after the first match and not check the rest of the document.
don't use snapshot for multiple nodes when extracting multiple nodes we prefer the "snapshot" mode that operates on a copy of the document as it was when the XPath started to be evaluated. Without this the evaluation will fail if a script changes part of the document before it's processed.
any: scalar results from functions and multiple nodes is necessary if you want to store the result of an XPath function. It processes all nodes, doesn't follow document order, and cannot operate on a snapshot.
Further detail is available in the documentation for the document.evaluate() function used to evalute the XPath against the document.
Fullquerylimit
The fullquerylimit step takes a fullquery parameter, and extracts from it some things that can be used for limiting the query. Typically these would be years, which often to go into a separate input on the web form, while the rest of the query can go in the search box proper.
To count as a "limit", the term(s) have to be ANDed to the rest of the query, and refer to one index field only.
The step has the usual inputs to define where to take the fullquery from, defaulting to $.input.fullquery_, and where to put the resulting limits, defaulting to _$.temp.year. Then there is a number of checkboxes:
- If ranges are to be supported, or only one value.
- If even single values are to be formatted as a range. This is deprecated, see below!
- If the range endpoints should be put into separate $.variables (default to _$.temp.startyear_ and $.temp.endyear, depending on the output variable name). If the query contains multiple terms, the ranges are merged if possible, and the proper endpoints set. If not possible, will fail with a decent message.
- If the limit terms should be removed from the fullquery parameter. Usually yes.
- If the step should fail if no limits are found, or continue silently. There is also an input for a fake value to be used in that case.
- If the step should fail if there are any similar fields remaining in the fullquery, after removing the limit, so they will not get in the way of processing it later.
- If the step should accept an OR-bag. That is, a part of the query, ANDed to the rest of the query, that only contains OR operators, and only equal-terms.
- If all the terms in the OR-bag should be concatenated into a single $.variable (default _$.temp.yearvalues_, calculated from the input variable name). These values are plain terms (no quoting of phrases, no truncation wildcards), and are separated with a single space. If you need anything more advanced, you should pass the resulting list through a fullquery step, where you have full control over its formatting.
The limit term(s) are returned in a format that is identical to what the listquery step produces. These can be used as inputs for a fullquery step, or they can be accessed directly, although that is not recommended. If there was only one value, it can taken from $.temp.yearlimit[0].term_, and if there were two, the start of the range will be _$.temp.yearlimit[0].term, and the end $.temp.yearlimit[1].term. See listquery for more details about the format.
The fullquerylimit step appeared in version 2.10
Fullquery
Some web sites support a more complex query language instead of, or in addition to, filling values in input fields. For such cases we have the fullquery step.
When making a search task with fullquery, no regular search arguments (keyword, author, title, etc) should be used. The fullquery argument contains all there is to know about the search. Unlike other arguments that are simple strings, the fullquery is a complex structure that reflects the query possibilities in Z39.50. The gory details are explained below, but here is a simple example (formatted for readability) { "op" : "and" , "s1" : { "term" : "king lear", "structure": "phrase", "field": "title" } , "s2" : { "term" : "shakesp", "truncation": "right", "field": "author" } } Depending on the step configuration, this will be translated into something like ti="king lear" and au=shakesp?
Configuring the step
The step configuration consists of five tabs.
General tab
Here you specify which parameter to transform from - almost always 'fullquery', and where to put the resulting query string, most often a temporary variable you will be using later.
Here is also a pull-down where you have to choose from a predefined set of starting points. These set up decent defaults for all the other tabs, so hopefully you don't have to change too much later. Once set, this can not be changed. If you got it wrong, delete the step and start with a new one. The starting points are
- CCL
- Library of Congress
- ALEPH
The checkbox 'Fail if no query to begin with' should usually be checked for simple fullquery connectors. In more advanced connectors that may invoke the fullquery step several times, it may be better to leave it unchecked.
Fields tab
Here you specify what search indexes are supported by the website, and how they are expressed. For example, a title search could be expressed as something like ti=hamlet. So you specify title for the field, and ti= for the string. There are buttons to delete unsupported fields, and one to add new ones.
If you need more complex structure than a simple prefix, you can use the magic XX marker to indicate the term, as in (ti=XX).
The last element in the list is always the (unspecified), which is the default string to use when there is no field specified in the query.
There are also two checkboxes. The first one causes the step to fail if it meets a field name not listed in this tab. In new connectors, this should (almost?) always be checked. The other checkbox causes the step to fail, if the query contains a term that has no field defined. This is perfectly valid, and should normally not be checked. But it can be useful to catch some errors in advanced connectors.
Operators tab
Here you specify the words used to indicate the various operators and, or, not, and the two proximity operators (ordered and unordered). Each of them has a checkbox where you tell if the operator is at all supported.
There are two ways to specify the strings. The simple one is just to write the word used for the operator, for example and. In some cases you need to put brackets around the whole thing, or do other stuff. Then you can write things like ( XX and YY ). The XX and YY will be replaced by the left and right operands, respectively.
For the proximity operators, the magic string %DIST% gets replaced by the distance limit in the incoming query.
Pay attention to white space! Some system require a space before or after the magic word.
Terms tab
The left half of this tab is about quotes. Most websites want some terms quoted, and some not. Here you can specify what kind of quotes to use for different terms
- word term: If the query has specified that this is a simgle word. Often you don't need any quotes.
- phrase term: If the query has specified that this is a phrase. Double quotes are a common choice.
- default term: if the query has not specified anything (as is often the case). No quotes is common.
For each of these you have a pull-down where you can choose between
- none
- custom. Enter the beginning and ending quotes in the input fields after the pulldown
- double quotes
- single quotes
- parentheses
- square brackets
- (Not supported) - causes the step to fail if the query contains this kind of structure. Usually only used to indicate that phrase searches are not supported.
Note that the custom style allows for more than one character in the quoting, should you ever need it.
The right half of the tab is all about truncation. It specifies what kind of truncation is supported, and how it is expressed in the query string.
Ranges tab
There are cases when we need to search by (numerical) ranges, most often years. The fullquery can handle those too (as of version 2.10). The Ranges tab specifies what to do with them.
There is an input to specify which fields are supposed to support ranges. Most likely that will be 'year', but one might imagine that we could meet other uses. If more than one field is needed, separate them by spaces.
Then come three inputs to define how the ranges are to be specified, if both ends are there, or only one end is available. Here you can again use the XX and YY strings to represent the values.
The fullquery step can only handle queries with one year range in them. It fails with an error if there are more than two endpoints, or the ends are in wrong order, etc.
Examples tab
In this tab you can test how your fullquery step will behave when it sees some predefined test queries. Just click on any of the descriptive links on the bottom of the tab, and a corresponging JSON string appears in the input on top. This is then translated according to the settings you have specified, and displayed underneath.
Using fullquery
The obvious way to use the resulting query string is to pluck it into an input field, probably on some sort of advanced search page.
Another, more effective way is to use the transform step to put the query string directly into the URL and go straight into the results page. That way we don't need to spend time fetching the search page, filling values, and submitting it.
For more advanced use of the fullquery step, note that it does not need to start with the original fullquery parameter. You can first apply a fullquerylimit step to remove some parts of the query, the a listquery step to convert the query to a simple list, then a listqueryelement to extract all terms that refer to (say) titles, and then use the fullquery step to transform those terms into a nice search string. In such case, you may not need to specify fields at all, since you already know that everything is about titles. But you may want to specify operators, truncation, and quoting, as usual.
Structure of the fullquery parameter
The fullquery parameter consists of a tree, built of two kinds of elements.
Operator node
consists of
opThe operator, one ofand,or, ornot(which means 'and not'), orproxfor proximity searches (see below)s1The left operand. This can be anotheropnode, or atermnodes2The right operand
Proximity searches have additional parameters. Many of them are not supported by the fullquery step (yet?), but are included so that we can later support the full Z39.50 standard.
distanceMaximum distance between the two termsorderedTrue or falseexclusionif present, must always befalserelationif present, must always be `le' for less than equal.unitif present, must always beword
Term node
A term node is more complex. It contains some selection of
termThe search term. Must always be there.fieldThe search index. Can be anything, most oftenauthor title keywordetcrelationOne oflt le eq gt ge ne phonetic stem relevance alwaysmatches.positionOne offirstinfield firstinsubfield anystructureOne of a longer list of alternatives, most oftenword phrase year stringtruncationOne ofright left both(or some other fancy value)completenessOne ofincompletesubfield completesubfield completefield
Note that the fullquery parameter can reflect anything that can come in a Z39.50 query. The fullquery step can not (yet?) handle all possibilities. Position, and completeness are not used by the 'fullquery' step at all, and structure only affects the kind of quotes to put around the term. Relation (other than 'eq' which is the default) is only reocgnized when dealing with ranges. Since the Z39.50 query system does not support ranges on its own, they are represented as something like (year >= 2000 AND year <=2009). The fullquery step tries to be clever in finding those ranges, but there may be queries where that is not always possible.
Listquery node
The listquery step will produce a structure that is quite like a fullquery. The differences are:
- It is a flat list, or technically, an array of term nodes. There are no subtrees, so no s1 or s2 elements.
- Each node is a term node, with the addition of an 'op' element. In the all first node this is empty, in the subsequent ones, it specifies the operator to appply between this node, and the preceding ones.
The fullquery step can accept a listquery-type parameter too, and do the right thing with it. In that case, you obviously can not use the (XX and YY) form on the operator tab, as that implies nested tree.
Examples
- { "term" : "foo" }
- { "term" : "foo", "field": "title" }
- { "op" : "and" , "s1" : { "term" : "hamlet", "field": "title" } , "s2" : { "term" : "shakespeare", "field": "author" } }
- { "term" : "shakesp", "truncation": "right", "field": "author" }
- { "term" : "king lear", "structure": "phrase", "field": "title" }
- { "op":"prox", "distance":3, "ordered":false, "s1":{"term":"dylan"}, "s2":{"term":"zimmerman"} }
- { "op":"prox", "exclusion":false, "distance":3, "ordered":true, "relation":"le", "unit":"word", "s1":{"term":"dylan"}, "s2":{"term":"zimmerman"} }
- { "op":"and", "s1": { "term":"shakespeare", "field":"author" }, "s2": { "op":"and", "s1": { "term":"2000", "field":"year", "relation":"ge" }, "s2": { "term":"2009", "field":"year", "relation":"le" } } }
Get Cookie
This steps gets cookies, either from the current document, or in the browsers cookie manager.
The recommended way is to set document cookies. These are the cookies any javascript on the page would see. They are returned in a limited form, only name and value, no domains, paths, expiry dates, etc.
The alternative is to ask for cookies inthe browsers cookie manager. This gets all cookies, also those not relevant to the current page. There can be multiple cookies by the same name, as long as they differ by host, path, or some other attribute. When working in the builder, that list may be quite long, but the engine always starts with an empty cookie jar.
You can ask for a single cookie name (whihc can result in multiple cookies!), for all cookies, or for cookies that match a regular expression. The match is usually against the cookie name, but it can also be against its value, or any other attribute - this may come in handy when working with browser cookies.
Both methods return an array of cookie structures. When there is only one, it will look like a single element, even if it is an array behind the scenes. The structure contains
- name - the name of the cookie
- value - the value of the cookie
- host - the domain where it applies (br)
- path - the path where it applies (br)
- expires - the expiry date, in seconds since 01-Jan-1970. (br)
- isSecure - has value "1" if the cookie has the Secure attribute (br)
- namevalue - A string with name=value (ro)
- attrs - A string with all the attributes of the cookie (ro)
- line - A complete cookie line, with namevalue and attributes (ro)
The fields marked with (br) are only available for browser cookies. The lines marked with (ro) are computed from the fields above, for easier access. These are ignored when setting cookies with the "Set Cookie" step.
Use examples
After logging in to a site it sets an auth cookie. It may be handy to read that cookie, and add it into a HTTP request to the server.
If there are cookie problems with a Proxy-Url step, it may be helpful to get all (browser) cookies for that domain, transform the path component to "/", and set those cookies back before invoking the Proxy-Url step.
The Get Cookie step was introduced in version 2.29
HMAC
Given a secret and a message, this step creates a hash-based message authentication code. The message can take multiple values in which case the encoded first message will be used as the key for the subsequent message and so on. Options are available to specify the hashing algorithm used and the encoding of the output.
HTTPclient (Deprecated!)
This step is deprecated as of version 2.25. Use the http step instead to fetch the response, and other steps to parse and process the result string.
Although we normally navigate to websites and fill in forms, many sites offer some kind of XML-based API to do all the searching. The HTTP Client step can be used to access such APIs. The most common way would be to have something like a fullquery step to produce a query in the form the service understands, then a constant step to build a special URL or SOAP request, substituting the query in its proper place, and then a HTTP client step to fetch the data. The resulting XML will be shown on the page, and can be parsed with the usual tools, most likely XPattern.
General Configuration
The general configuration tab is where you specify the URL of the web service, and if you want to use a GET or a POST request.
Request tab
this is where you can specify the request body (from a $.variable). Naturally, a GET request needs no body in its request, the URL should contain all that is needed.
Here you can also add extra headers to the request, should the site need such. These can be useful for authentication, or for other strange things.
HTTP client
Although we normally navigate to websites and fill in forms, many sites offer some kind of XML-based API to do all the searching. The HTTP Client step can be used to access such APIs. The most common way would be to have something like a fullquery step to produce a query in the form the service understands, then a constant step to build a special URL or SOAP request, substituting the query in its proper place, and then a HTTP client step to fetch the data.
This step makes the request, and stores the result as a single string. There will be other steps to parse and decode that string, be it XML, JSON, or something else, or to display it on the page, for XPattern and other tools to work on.
General Configuration
The general configuration tab is where you specify the URL of the web service, and if you want to use a GET or a POST request. There is also a checkbox for failing on errors.
Request tab
This is where you can specify the request body (from a $.variable). Naturally, a GET request needs no body in its request, the URL should contain all that is needed.
Here you can also add extra headers to the request, should the site need such. These can be useful for authentication, or for other strange things. To make such headers, create a variable ($.temp.headers?), probably with the constant step, it has a template for headers.
Response tab
Here you specify where to store the response from the server. You can also store all the response headers. These include the status code, which is normally 200, meaning OK. But if the "fail on errors" box is not checked, you can see 404's and all other kind of errors.
There is also an option to save the data as binary. That forces it to be base-64 encoded, so that it will survive any processing. A client program must decode the data before using it. Should be used for pdf files, images, and other stuff that really is binary in nature.
The http step appeared in version 2.25. Before that, we had a httpclient step, which is now deprecated. Before that, our go-to-url step had an option to fetch raw XML... The option to base-64 encode binary data appeared in version 2.30
Join
The "Join" step joins the values of a repeated field together into a single field, using a specified glue string.
For example, XPattern may return "description" in multiple segments, such as paragraphs or several tagged fields. Instead of leaving this data in separate, repeated fields, "Join" will concatenate them into a single "description" element.
Specify the "glue string" (string to be inserted between concatenated fields) in the box provided.
Listqueryelement
The listqueryelement step takes something a listquery step has produced, and extracts one or more elements from it, in a format that is quite similar. Often these lists have only one element - but technically speaking they are still lists.
The step can mark parts of the listquery as used, and take care not to use the same element again. This way, it is possible to call it repeatedly, and get different results.
Configuring it
The configuration screen consists of:
- Input variable. Typically $.temp.listquery. Something produced by the listquery step.
- Output variable. Typically $.temp.elements, but you can use what you like.
- Three check boxes for handling the flags that mark some elements used:
- Clear used flags before starting. Should normally not be needed, the flags start as off.
- Mark returned elements as used. Should normally be selected. It may make sense to unselect this, in some special cases (maybe you want to see if there is anything with title, but not (yet) process the titles).
- Only return unused elements. If not set, the step will always return the first thing it finds.
- A pull-down to select which field you are interested in. You can select common values like author, title, or keyword, or let the step find the first one it meets.
- An input to specify how many elements you want. Normally you want just one, or you want all that relate to the same field, but it is also possible to ask for two.
- A second set of checkboxes.
- Fail if nothing found.
- Fail if unused elements left. This should be checked on the last listqueryelement step in a connector, so we fail if the query has more (different) terms than the website can handle. If forgotten, the connector will ignore such cases silently, which is not what we want.
- Fail if list not ANDed to preceding. Causes the step to fail if the list of elements is not ANDed to the preceding part of the query. This is useful for websites that have implied ANDs between different fields. If the query tries to search for author OR title, the website can not handle such, and it is proper to fail.
- Fail if anything but ANDs. On some sites you just put all the terms in an input field, and the site assumes you want them all. Checking this box will guarantee that if the query actually asks for things ORed or AND-NOTed, the step will fail. ### Simple use example If your advanced search page has an input to search for author, and one for title, you can use the listqueryelement to extract one author, and then put that in the input field. Most likely you want to use a fullquery step to do the translation, so you can configure truncation and other finesses. Then repeat the same for the title.
More advanced
If your page accepts more complex queries in the input fields, you can tell the listqueryelement to return all authors in one list, and use a fullquery step to build a query of them.
See also the Advanced Search Pages The listqueryelement step appeared in version 2.9
Listquery
The listquery step is intended to assist in filling out "advanced" search forms. It takes a fullquery parameter, which can in theory be a very complex thing, and produces something simpler, that we hope will reflect a search form a bit better. In order to do that, it needs to look at the fullquery in various ways, and come up with something equivalent that can be expressed a simple list of terms and operators. If the query is too complex, the step will fail with an error saying so.
Configuration
The configuration of the step is not difficult. It has only a few inputs:
- Where to take its input from. Typically $.input.fullquery
- Where to put the resulting listquery. Typically $.temp.listquery, but you can choose any other variable if you like.
- How many terms can the site handle. In most simple cases, that is the number of inputs on the form where you can enter terms. In more advanced cases, leave this empty, and the step takes the whole fullquery parameter.
- What index to use if no field defined in the fullquery.
There is also an option to make a stringterm for each listquery element. This is the term of the element, with some transformations applied to it. You can configure supported truncations, and if quotes should be put around a word or phrase term. Later, for example after extracting a listqueryelement out of the list, you can take the stringterm and put it directly on thesearch form on the web page. ### Result The listquery step puts its result in a variable, as directed. This is another complex structure. It may look a lot like a fullquery, but there are some crucial differences:
- It is a list of similar elements. There are no nested subtrees, no "s1" and "s2" elements.
- You can access each element by indexing, like any a array. The first element is typically $.temp.listquery[0]
- Each element has an "op", which may be empty in the first one, and a "term". It may also have all the other things a term can have in a fullquery, relation, truncation, etc.
Example
This is getting a bit too abstract, so here is a concrete example. The user types in a query
(war or peace) and (year=1999)The CF turns that into a fullquery
{ "op": "and",
    "s1": { "op":"or",
           "s1": { "term":"war" },
           "s2": { "term":"peace" }
          },
    "s2": { "term":"1999", "field":"year" }
}
Now the listquery step can turn this into a list:
{"op":"", "term":"war", "field":"keyword"},
{"op":"or","term":"peace","field":"keyword"},
{"op":"and", "term":"1999", "field":"year}
Things to note:
- All elements have an "op" field, but the first one has an empty one. The operators are supposed to be in between the terms, so there can not be any in the first one.
- All elements have a field defined. Since the keywords lacked that, the listquery step helpfully fills in a good default.
- This is a simple list, nothing is nested inside other nodes. There are no "s1" or "s2" elements anywhere to be seen.
What to do with it
It is all well to get the fullquery parameter simplified a bit, but in the end you need to have something that can end up on a search form. The most obvious thing is to use the listquery as an input for a fullquery step. It understands this simplified format too, and produces reasonable output from it.
Another way is to use the Listqueryelement step to extract one or more parts of the listquery, and then use a fullquery step for each of them. Typically, one listqueryelement step for each of the search inputs on the page. See examples on the Listqueryelement page and the Advanced Search Pages page.
It may also be helpful to use the map step to map field or operator names ('and','or','not') into something that be plugged into pull-down menus on the site.
The listquery step appeared in version 2.9
Map
The Map step maps a list of values into another list. Typical uses include mapping field or operator names into something the website uses in its pulldown lists.
The step configuration has the usual two variable settings, where to take the value to be mapped from, and where to put the result. Then there is an input for a default value, to be used if the input value is not there at all (as can happen with field names), with a checkbox to indicate if the step should fail in such case. Then there is another input, default value, where you can specify what any unrecognized value should be mapped to. There is also a checkbox to fail the whole step if it meets an unrecognized value.
Finally there are lines for the mapping itself. Clicking on the 'Add map' button adds lines, and clicking on the 'X' next to each line will delete it. Each line contains a value to map from, and a value to map to.
The map step can also be used with more complex data, for example a listquery, where it maps each term separately, or parsed results.
Mouse
A more advanced Click step, Mouse allows sending of an arbitrary mouse event to a target object. Instead of clicking, you may wish to simulate the mouse pointer leaving the object. Maybe even doubleclicking the middle button while holding down shift. See Mozilla's initMouseEvent documentation for full details on what is possible.
Go to URL
This step simply opens a URL. The URL itself can be given as a static value (i.e. it is stored in the connector), or it can be supplied as a parameter, e.g. to make one connector that works with multiple identical-looking sites.
A clever connector-author can also use this function, in conjunction with some of the transformation steps, to construct a search URL directly from a keyword query parameter, or preferably from the fullquery parameter. This is more complicated than using a search form, and it doesn't always work, but on occasion, it can be used to construct extra efficient connectors.
There is also a checkbox "Load Raw XML", which causes the step not to open the page the usual way, but to load it into a hidden buffer. This is useful when dealing with web services that return XML instead of the usual HTML. When in the builder, the step still displays the XML document it loads, but when running in the engine, it does not bother, which makes this quite effective. It can also be used for regular HTML pages, but that is a pretty advanced topic.
Normalize date
"Normalize date" is a common parse step, most frequently used to transform publication date formats in result sets for serials and periodicals.
Adding a "normalize date" step changes dates to a standard form such as YYYY-MM-DD or YYYY-MM, allowing for consistent display and interpretation by programs interacting with connectors.
For example, result sets for the New Yorker (a weekly serial) display article publication dates in the following format: October 05, 2009. Applying "normalize date" to this string converts the date to: 2009-10-05.
Like the "Normalize URL" step, the "Normalize date" step just works--no intervention or tweaking required.
Normalize URL
In a parsing task, the “normalize URL” step automatically adds the website prefix to the URL string extracted from a result set’s HTML. Magically enough, "It just works."
For example, running search and parse tasks in the NIH Clinical Trials database returns raw HTML data from the “attributes” node of the title section:
href="/ct2/show/NCT00972257?term=betimol&rank=1"
(visible in the results pane in the lower left of the screen after running "Parse by XPattern" in the builder)
By adding a “Normalize URL” step after the “Parse by XPattern” step, the Connector Builder supplements the HTML data with the site's URL to create a meaningful link:
http://clinicaltrials.gov/ct2/show/NCT00972257?term=betimol&rank=1
Complete URLs are required so that connector users can click through to electronic resources retrieved by queries.
Parse by Selector
Takes elements matching a CSS selector (Container selector) and considers them records with values for fields extracted from within via a list of selectors and associated field names. The resulting output is a list of objects in the target variable (Container path), very similar to the Parse by Xpattern output.
Field selectors are added via the "add selector" button and have three text boxes: the CSS selector for the field value(s), an optional attribute name (otherwise the text content of the element will be taken), and the name for the field.
The "clean whitespace" option removes leading and trailing whitespace and normalises all whitespace characters output by the step to single spaces (eg. newlines, tabs, sequences of spaces).
"Fail if no match" will cause the step to fail if no elements match the container selector.
Proxy URL
Sometimes the web sites we search return records that contain links for more stuff about each record, for example a full text. Often these links only work for users who have authenticated for the website. While searching, we do the authentication in the init task, typically by entering user credentials into a form, or by using a dedicated proxy that happens to have an authenticated IP address.
If we just pass the links in our results, they will end up on the user's screen somehow. And the user is likely to click on them, and run into "Access denied", because the user has not gone through the authentication, and is not coming from an IP-authenticated machine.
To get around this problem, we have created a content proxy system.
The process starts with the proxyurl step. It stores all the cookies and other session data in a special file for future use. Then it rewrites the URLs in the record to point to our own content proxy, like this: http://cproxy.indexdata.com/some.prefix/999999/some.other.site.com/result?recno=42
When the end user click on such a link, he gets to our proxy server. The proxy retrieves the session data, sets up cookies etc, and fetches the original URL, which it returns to the user, rewriting all links on the page to point back to the proxy server. This way, all the authentication is in place, and the site will return the desired page.
The proxying of the pages is quite much more complicated than that, and even so, will never be 100% reliable. Web designers try to be clever with cookies, javascript, redirects, and what not. Often way too clever.
Configuration
The step has a tabbed configuration interface. In most of the cases, you will not need to venture beyond the first tab, called "Fields".
To save space on the screen, most tabs are not displayed intially. Instead, there is a meta-tab "Show all tabs". Clicking on that will make all tabs visible. Normally, only some of the more important tabs are shown, and those that have custom data on them. This should not be very many.
Fields
Here you can check the boxes for those fields that contain URLs that need to be proxified. Most likely they are already set the way they should be.
If you have added a new URL-like field, you can tell the step to proxify that too, by specifying the full $.variable.address under the "custom" section.
Let me repeat that this is more than sufficient configuration for almost all sites. The remaining tabs control some dirty tricks in the cproxy. Most of the tabs have a little piece of text explaning what they do, but these are complex matters, and there is little space, so that text will not tell you everything. Even this article is too short to cover all the possibilities.
Session
Each proxy session needs a number. That can come in as a parameter, or most often the engine picks up a random one. This tab controls where the number is stored, and if a new one should be generated for every page of results. Normally that should not be necessary. There is also a checkbox for rewriting the session file every time the step is run. This is a good idea, it makes sure the session file contains all the latest cookies etc. On some rare sites you may be better off not doing that, especially if you have a proxy-url step in the init task too.
There is an option to store all the proxy-urls configuration into $.variables. The setting gives the name of the base variable, for example $.temp.cproxythings. Under that the stop will create the following subkeys:
- sesdir: the directory where the session files are saved
- proxyhost: Name of the proxy host, including any URL prefixes it uses
- session: The session number
- proxyurl: Beginning of a proxified URL
These can be used in writing custom replacement rules, and other stuff, already in the same proxy-url step. Normally this should not be necessary, but there will always be cases where the page(s) will contain mysterious javascript to build up URLs, and those can not always be proxified correctly. With these $.variables, it will be possible to use a custom-replacement to make partial proxification of some url-like strings.
There is also an option to store the whole session file contents in a $.variable, and to use the contents of a $.variable. These advanced options allow you to get to the data written in the session file, maybe do some transforms on it, and use the results instead. The data comes as one long string with newlines in it, so you may want to uncheck the "clean whitespace" box in any transforms and/or split the string by newlines and work on it line by line. This is very advanced trickery, and should be used very rarely, if at all. Probably only for getting around some bugs in the cproxy. This feature appeared in version 2.29.
Auth
Here you can tell the cf-engine to omit some basic authentication. We have seen sites that require a proper login, but will get confused if they also get a HTTP authentication. On such sites selecting username and password may help. If the cproxy does not see a username, it will never create the Authentication header. Such sites should be very rare.
Cookie wildcard
Cookies can be tricky. On a normal website, the site sets cookies, the users browser remembers them, and sends them back to the website. But when we are using cproxy, it sits in between, and has to rewrite cookies back and forth. What is worse, the way we rewrite the URLs, is not fully compatible with the way cookies specify where they should apply. So a 100% solution is not possible, especially when the site sets cookies with wildcard domains (like .indexdata.com) which are supposed to apply to all subdomains under indexdata.com (like www.indexdata.com)
Normally the cproxy does a fairly decent job at mangling those wildcards, but we have seen examples of sites that will not work directly. At this tab you can explicitly define that cookies for .indexdata.com should be expanded to www, auth, search, and results.indexdata.com.
The tab consists of two columns. The first is the wildcard domain, and the second is a list of expansions for it, separated by spaces. There are three special values you can use: '-' (a single dash without the quotes) tells the cproxy to forget its built-in expansions for that domain, and '' (an asterisk) tells the cproxy to expand the cookie for the whole session, and '.' tells cproxy to expand the domain to the current page. The built-in default is '. ' which means the page and the whole session. This is often good enough. The cproxy configuration may contain better defaults to some sites.
Omit Cookies
Occasionally it makes sense to tell cproxy not to send (some) cookies to some domains, typically domains totally outside the web site itself (googleapis.com is a good example). This can be controlled in this tab.
The tab has three columns, "Method" (usually empty, defaults to all methods, but can be used to restrict this to GET or POST requests only); "Domain" that is a regular expression matched against the domain of the request we are processing; and "Cookie names", which is a space-separated list of regular expressions. If any of them match the cookie name, the cookie will be silently dropped. Either the Domain or the Cookie Name may be empty, in which case the default is all domains or all cookies. Obviously one or the other must be set to something.
Skip Links
This tab instructs the cproxy not to proxify some given links. For example, if a page fetches some javascript from googleapis.com, there is no need to pass that through the cproxy, things will work faster directly. And doing it directly is less likely to mess up with the cookies of the site.
This tab has two columns, the first one is a regular expression to match against the URL of the page we are processing, and the other matching the link we are just about to rewrite. If both match, then the link will not be rewritten. Both default to '.*' which matches anything. Of course one or the other must contain something meaningful, or there may be no proxying at all!
Replacements
This is a tool of last resort. It instructs cproxy to do a global replace of any regular expression on the page. This is done after all proxying is done, just before the page is returned to the users browser. Since this is a simple text matching, it can match inside javascript, css, html tags, or text content, possibly breaking up the whole page. It is possible to use this for practical jokes, like replacing a company name with a competitor, but such is strongly discouraged.
The tab has four columns. The first is the regular expression to match. The next is the replacement string. If the regular expression contains parentheses, those can be referred to as $1, $2, etc, just like in the transform step. The third column is for options. At the moment only 'i' is recognized for inditacting a case-insensitive match, and a dot is a placeholder which is ignored. The last field is a content type, again a regular expression that has to match against the content-type header of the page, for example to restrict to 'application/javascript' or 'text/html'.
Like in any of these settings, you can use $.variables in your values.
BasicAuth
Normally the cproxy sends a HTTP Authorization header with most requests, if we have a username, depending on the URL of the request. If nothing is specified here, the decision to send the header is based on the BaseUrl line, making sure that the header gets sent to pages that need it, and nowhere else. Occasionally it may be necessary to send such a header to other sites. This can be accomplished by setting up a regular expression, for example 'www.indexdata.*' to cover both indexdata.com and .dk.
If you wish no Authorization header to be sent at all, you can give a regular expression here that will not match any link, for example '^do-not-send-auth$'. But it is easier just to check the "omit username" box in the regular auth tab, that also prevents the header.
Request headers
This tab tells cproxy to mangle the headers in a request it sends to the web site. The tab consists of three sections: List of headers to skip, list of headers to add, and a line where you can enter new headers.
Each line consists of a page, which is a regular expression matched against the URL of the request the cproxy is about to send. This can just be the site name, as in "indexdata.com", or it can specify the file type, as in ".*.jpg". (note the dot has to be escaped with a backslash). After that comes the name of the header, case sensitive. Finally, for adding headers, there is the value for the header.
Response headers
This tab tells cproxy to add and skip some headers before it returns a web page to the users browser. The tab works the same way as the Request header tab.
Extra
This tab is for future use. It allows you to add almost any lines in the session file. It is intended for the situation when a new cproxy has been released, but the engine and builder are not yet upgraded, or when we have implemented so rare features that it was not worth the trouble to make an editor for those.
At the moment there is one such setting: CproxyHeader. It controls the way cproxy adds headers to the requests and responses. These headers are "X-MK-Component" which tells that this was done by cproxy, and its version and SHA1; and "X-MK-Environment" which tells which operating system and version this happened under. These help us to locate where a given request was actually processed, especially when we have load balancers and proxies in the picture. This setting can be controlled by adding an extra line that starts with the (misnamed) word "CproxyHeader", followed by one of "none", "request", "response", or "both". If not specified, the cproxy uses its own configuration to make the decision, almost always defaulting to "response" only.
Session file
This tab shows the session file, as it will be created from your builder. This probably contains more cookies than you will see from the engine - unless you go and clear all cached data in your browser. There is nothing you can do on this tab, except to enjoy the view.
Config file
Where does CF know the address of the cproxy server to put in the URLs? That comes from a configuration file, located at /etc/cf-proxy/cproxy.cfg. If no such file is found, the builder will create some kind of links, which will look all right, but not really work. This is usually enough to build connectors.
The file could look something like this:
# The hostname that runs the proxy, and a constant prefix
proxyhostname: hpxy.indexdata.com/XXX/node102

# Where the session files are kept.
# The directory must exist. Trailing slash is optional
sessiondir: /tmp
Setting up the cproxy server itself is a bit more tricky, but falls outside this article.
The advacned configuration features appear in version 2.24, and the saving of various proxuy-url configs appeared in 2.30
Rekey
Maps the key names of every object matching a path and stores them as an array at the specified destination. Provides the option to include or ignore unmapped keys and to coerce scalar values into arrays.
For each key you can also provide a JSONpath. Instead of copying the whole value of that key it will take only the part matching the path.
When your source is an array of objects you'll want to specify that with [*] at the end of your path in order that it returns a list of objects rather than just the array.
The "append" checkbox for each mapping indicates that, rather than replace the destination if it exists, the step should instead append the value(s) to the array if one happens to already be stored at that key.
RenderXML
This step takes a structured document, for example XML, and displays it on the page, in a form that can be used by parse_xpattern and other steps.
Configuration
The configuration is simple. There is a $.variable selector to tell where the XML is to come from, and a pull-down to choose the format of the document. At the moment the possibilities are
- text/xml strict XML rendering
- text/html More relaxed rendering for HTML and broken XML
- JSON for JSON encoded strings
- $.variable for our own variables
The JSON rendering first parses the JSON into a js object. The $.variable works with the js object directly from task.data. Both of these are first converted into XML, and the processed as such.
Notes
When creating a XPattern to work with a rendered page, you may have to click on such part of the screen that selects the whole line, with start-tag, value, and end-tag. This is due to some technical trickery we haven't quite ironed out yet.
The renderXml step appeared in version 25, the HTML rendering in version 27, and the JSON and $variable rendering in version 28.
The HTML rendering fails miserably with XulRunner-10, which we were using up to version 26.x.
Retry
Causes the preceding step or steps to be run again. Most useful as an Alt step to try again on failure.
Set Cookie
This steps sets cookies, either in the current document, or in the browsers cookie manager.
The recommended way is to set document cookies. This is done by assigning to the doc.cookie variable, and letting the browser do its magic with that thing. The document cookies may contain a hostname, path, and expiry time, although reading the document cookies with the "Get Cookie" step will not return such details.
Browser cookies can be useful if you do not yet have a document (as in an init task), or if you plan to go to a totally different URL, perhaps in an API connector.
Both methods can take a single cookie, or an array of them. The cookies may be strings, or structures as those returned by the "Get Cookie" step, possibly after transforming some of the elements.
Configuration
The configuration consists of two parts: What type of cookie(s) to set, and which $.variable to take them from.
The Set Cookie step was introduced in version 2.29
Set preference
Mozilla based applications such as Firefox and the Connector Platform store settings as Preferences. The Set preference step can change these values as needed during the execution of a task. After task completion the original value will be restored. For convenience this step includes common operations such as disabling Javascript, overriding the user agent, and disabling cookies.
Set Form Value
This step will set the value attribute of an element and send it a change event. It is most useful for filling out forms and especially for populating a text box.
The value can either be text entered when setting up the step, or the first match of a provided data spec. For instance, a task to perform a search probably requires a keyword argument; the "Set form value" step can be set to put the value from $.input.keyword into the search box invoked by the connector.
A note about drop-downs: A form element one often encounters is the select element which lets you select one of several options. However, the value set does not necessarily correspond to the text displayed. Rather than looking in the page source to determine the value for the desired selection, the Set form value step provides a shortcut: Clicking on the select element to choose it as the target of the step causes the menu will drop down. Proceed to click one of the site's menu options, and the step will automatically be populated with the value of that selection.
Simple query
The simplequery step takes a fullquery-type parameter, and extracts individual fields from it. As the name implies, it works on fairly simple queries only, everything has to be ANDed together, etc. It puts the extracted values into $.variables, typically in _$.temp_ (but for compatibility, it can also set them in $.input, the way cf-zserver does).
The simplequery step duplicates most of the functionality that is in the cf-zserver. We plan to remove that query manipulation from cf-zserver at some point in fairly distant future.
Using a simplequery step opens up some more possibilities. It is possible to manipulate the fullquery parameter before invoking a simplequery, for example to remove limiting terms with a fullquerylimit, or even to use the step differently in two different next-if sequences. It is also possible to control the step more precisely; you can tell for each field if truncation, phrase quoting, and/or ranges are to be supported.
The step configuration consists of two tabs: general, and fields.
General tab
Here you specify which parameter to transform from - almost always .input.fullquery, andwheretoputtheresulting.variables, most often in $.temp_. (So, if your step supports author search, any authors in the incoming query will go into _$.temp.author_)
There are also inputs for specifying the wildcard character used for truncation, and the quoting style to be used for phrases. Normally the quotes should be the same, but it is possible to specify different quote strings (which can be as long as needed) for special cases like using parentheses around a term, or even XML tags.
Fields tab
Here you specify what search indexes are supported by the website. For each field, you tell what special features it supports. There is a pull-down at the bottom of the tab for adding more fields. Each field line has a button in its right end for deleting the field.
Truncation
There are checkboxes for left, right, and both truncation, as well as for masking. The truncation is always done using the wildcard specified on the general tab. For example, if the query specifies "truncation":"both" for an author term that is 'atermel', and you have selected the 'both' truncation for authors, then $.temp.author will be set to '*atermel*' (or '?atermel?', depending on what you set as the wildcard). If you have not checked the 'both' truncation box, and the query requires it, the step will throw an error.
Phrases
There is one checkbox to indicate if phrase quoting is supported. If checked, and the query contains "structure":"phrase", then the term is put inside the quotation marks, as specified in the general tab. Again, if you have not indicated that the site supports phrases, and the query requests it, the step will throw an error.
Ranges
The old system used to create fields 'startyear' and 'endyear' automatically. The simplequery step extends that functionality to any index you care to mention (although, in real life, 'year' is almost the only one where it makes sense). If the 'ranges' checkbox is checked, the step will automatically create $.temp.startyear_ and _$.temp.endyear. If the query contains exactly one start and one end year, those are used. If one is missing, that variable is not set. If the query says something like "year=2000", both start and end are set to 2000 - as well as $.temp.year itself. If the query has some weird combination of start and end years, those are combined into a single range if possible. If not possible, an error is thrown. Of course, if you have not checked the 'ranges' box, and the query has any kind of "relation" for that field (that is not "eq"), an error is thrown.
The simplequery step appeared in version 2.14
Split
The "Split result" step is used to divide a single string of repeated data elements into separate, repeated fields.
For example, the DOAJ connector returns strings of author names in the following format:Hyeong-Ho Park ; Xin Zhang ; Yong-June Choi ; Hyung-Ho Park ; Ross H. Hill
The "Split result" step will parse each individual author into a separate field, as long as there is a recognizable character or string of characters marking where the split should occur. In this example, the string of authors becomes:Hyeong-Ho ParkXin ZhangYong-June Choi[etc.]
To accomplish this:
* Select the data elements to which the split applies--in most cases Results
* Designate the parsed data that is to be transformed--in this case Author
* Indicate the target field for the newly "split" data--in this case also Author
In the box below the data selection, enter a simple delimiter or regular expression that separates the individual elements--in this case, a semi-colon. The matching strings will not be included in the output.
Submit
This step sends a Submit event to a form element, causing the form to be submitted to the site's server. This step is particularly useful in cases where a "submit" button is not provided by the target website.
Transform
Transform is a sort of overgrown search and replace. It reads some text from a variable, replaces the part that matches the Regular expression: with the string in the Replace with: field, and then writes out the result. In fact, if your regular expression and replacement are both simple strings it works exactly as you would expect from a search and replace feature.
When nothing matches, nothing is replaced---your source is output just how it is.
Regular expressions
A regular expression is a conscise way of matching specific text. You can specifiy that you want the bit after the colon but before the comma except when there is a five digit number at the end. Or, indeed, more complicated criteria than human language can reasonably express. Rather than some convoluted description you can instead specify it in what looks like gibberish but is in fact a very elegant and exact representation of a pattern of characters. Please see the guide linked above or whichever of the so very many sites that have been written to introduce the topic. It's an important life skill!
In order to assist in crafting these satisfyingly arcane sequences, an editing tool is provided that will take some sample text and highlight what matches. There are also some helpful examples pre-prepared for your convenience and available at the click of the a button from the bottom of the configuration panel. If you find yourself using the same pattern very frequently, please suggest that we add it here.
Options
The Transform step is roughly analgous to the regex substitution operation, often represented s/original/replacement/. Indeed, that's how it works. It also exposes the standard substitution options:
- Global: replace all matches instead of just the first one
- Ignore case: case insensitive match
Additional options are also provided:
- Clean whitespace: replace all spaces, tabs, newlines and similar with a simple space and also remove any such characters from the beginning and end
- Fail if no match: cause the task to error when the pattern does not match; useful in conjunction with the alt feature
- Remove match from source: self explanatory
Replacements
Beyond a simple string, one can select parts of the source to include. This is done by deliniating parts of the regular expression with parenthesis, referred to as groups or submatches. Each group can then be included in the replacement via $ followed by a number indicating the group in order of appearance starting from $1 for the first.
Stored data can also be included in the replacement string using the {$...} syntax described in the data model documentation.
Multiple targets
To the right of the replacement are buttons to add and remove additional targets. A common application is to use grouping to extract several parts of the text and place them in different outputs.
Parse by XPattern
XPattern, a hybrid between XPath and regular expressions, is a language created by Index Data specifically for identifying and addressing parts of an HTML document.
The "Parse by XPattern" step breaks the HTML of a result set into recognizable descriptive and bibliographic fields for display, manipulation and mapping purposes, and is most frequently the first step in the "Parse" task of a connector.
The Builder enables automated creation of XPatterns via a built-in pattern designer. To begin, click "Design XPattern" then successively click on relevant sections of the results set returned from the connector's "Search" task. For each section selected, pick the appropriate data type (author, title, etc.) from the corresponding drop-down, and indicate whether or not the field is required (obligatory) or optional. The designer will update the pattern and highlight hits on the page as you work with it.
Selected sections of a webpage may contain important related attributes. For example, many "title" fields have an href attribute that can be mapped to URL, so that programs interpreting the connector can provide links to the resources.
The configuration of this step is divided in five tabs:
Designwhere you can interactively design your XPatternEditwhere you can edit the XPattern manuallyHistorywhere you can try out previous versions of the XPatternOptionsfor the stepHitnumber check. A simple tool for checking that the XPattern will not miss hits on the page.
For more detailed information on XPattern see:
GrammarRegular nodesCardinalityAttributesText matchSpecial nodesModifiersGroups and alternativesNegation
Designer tab
The XPattern Designer is an interactive way to generate XPatterns to match hits from a page. It is necessarily somewhat complex, since XPatterns are so powerful.
Starting from empty
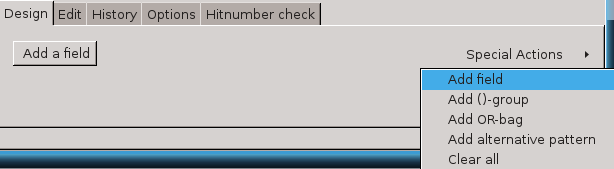
In the beginning the designer looks pretty empty. There is one button, and a pull-down menu. The menu has 5 points:
- Add field
- Add group
- Add or-bag
- Alternative pattern
- Clear all
The "Add field" button does the same as the "Add field" menu point, starts the XPattern with a regular field. Groups, Or-bags, and alternatives will be explained later. The last point clears the whole designer, for a fresh start.
Adding a field
Clicking on the "Add field" button, or selecting the same point from the Special Actions menu (or from the Action menu on a field line), will launch the node selector.
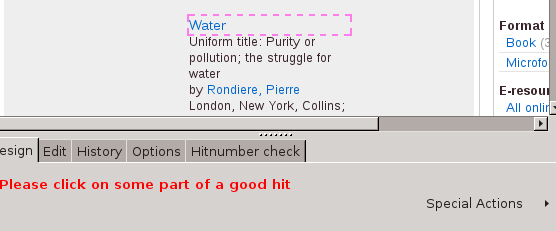
Move the cursor around the page until you have enclosed some good field, like a title. Click on it, and you have your first field.
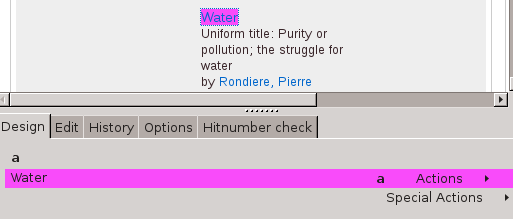
The lone a on the top line is your XPattern so far. The next line is your field. It is highlighted in some random color, and the field you clicked on the page is highlighted in the same color. The designer opens the variablemenuforyou, andtriedtoguesswhichvariable should be used for this field. It is not very clever in making those guesses, it recognizes a few fields (like dates), and otherwise it takes the first unused $variable in the list.
The field line consists of
- Text content, 'water'
- XPattern fragment 'a'. Clicking on this opens a menu for the cardinality.
- variable(orplainʹ' if no variable has been set). Opes the $variable menu.
- Actions menu
There will be more stuff once you have added attributes, patterns, etc.
At this point your pattern matches something on the screen, so there will be a little bit of text next to the "Add" button. Something like 23 hits 21p (120 nodes (120 starts) of 600 =0.2) This means that the pattern found 23 hits, with 21 pieces of data (some A's must have been without any text content, perhaps images only). The numbers in parentheses are about the XPattern matcher performance. At this point you can ignore them.
Field actions menu
The Actions menu is where most of the action happens. Changing things through this menu will change the XPattern directly, and probably affect highlighing on the screen too.
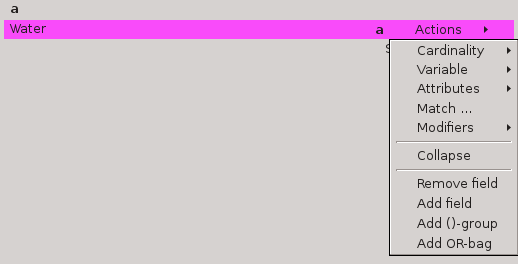
Cardinality
If the field is required, optional (?), can repeat (+), etc. The cardinality menu can also be accessed through clickin on the tag name on the line. See Cardinality for details.
Variable
Here you can specify the $variable the field will go into, for example $title, by selecting it from the submenu. This menu can be quite long, if we have many variables defined in the template. The variable menu can also be accessed by clicking on the variable on the field line.
When you set a variable, all matching hits will be highlighted in a duller version of the same color.
Attributes
This shows a list of attributes belonging to the field on the page. You can choose one, and a corresponding attribute line will be created below the field line, in the same color, suitably indented. More about that below.
Match
Here you can specify that the content must match a regular expression. See text match.
Modifiers
Here you can add modifiers like -whitespace or -html to the XPattern.
Collapse / Expand
This point hides all attributes etc. for the field, and collapses it into a one-line display. The same can be achieved with double-clicking the line itself. This is a handy way to save screen space while working on some other line. Especially useful for groups and alternatives.
Remove field
Removes the whole field line, with all its attributes etc. You can always get it back via the History tab
Add field
Adds a new field below the current one. Normally the order of fields does not matter, but in some cases (groups, or-bags, etc) it does. The "Add Field" button does also add a new field. It will try to guess where you most likely want the new field to be.
Add group
Adds a group line. See groups and or-bags below.
Add or-bag
Adds a different kind of group line. See groups and or-bags below.
Example
Here is an example of the designer, with two fields defined, and many of the above options used
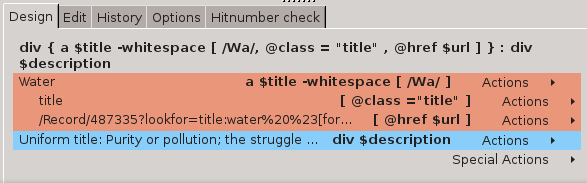
Note that the XPattern contains more than just the two fields specified. It has been generated so that it actually matches what we have on the page, in this case putting DIVs around the fields.
Attribute line
The attribute line is like a field line: It starts with the text content, has a XPattern fragment, and an action menu, which is much simpler than for a field:

Must ...
The first options specify if the attribute must be present, must equal a given value, or must match a regular expression.
Match
Allows you to edit the value (or pattern) the attribute must match. The default is taken from the actual value on the page, so it is not often you need to change this.
Variable
Specifies that the attribute value is to be collected into a $.variable.
Remove
Removes the attribute line.
()-Groups and Or-bags
These two behave quite the same way in the builder. The difference is that a ()-group produces an XPattern fragment in the form ( A : B : C ) whereas a Or-bag produces something like ( A | B | C )+. Both kind of groups can contain simple fields, or other groups. They may also have a $variable associated with them. See Groups and alternatives for more details.
The group lines are simpler than the rest, they only have a group type in the left end, and an action menu in the right end. The menu is so much like the other menus that there is no need to list all its points.
Note that adding fields into the group will indent them deeper, to indicate that they are part of the group.
Remember also that double-clicking on a group line will collapse it, possibly freeing a lot of screen estate for working with another group. The group line will show some of the things inside, so you can see where you are, as in the Or-bag example above.
Alternative patterns
The "Add alternative pattern" point in the Special actions menu changes the designer to work with pattern alternatives. Each alternative behaves like a complete XPattern, as far as the designer is concerned. You add fields, groups, attributes and everything as before. The designer creates the XPattern by combining all the alternatives in one pattern.
As usual, you can collapse an alternative line by choosing "Collapse" in its menu, or simply by double clicking on it. There is also a menu point to collapse all other alternatives, if you want to work on this one only.
When working with alternatives, the points to add fields, groups, etc. in the Special Actions menu are disabled, as such can not exist outside the alternatives. Use the menu for the current alternative instead, or trust that the "Add Field" button will add one in the right place.
You can delete the whole alternative from its menu. When you delete the last one, you revert to the old way of working without alternatives.
Starting from an existing pattern
When you open an existing connector in the builder, it tries to re-establish the designer so you can continue working on it. It will have to try to guess what you would have been clicking on the current page, and highlight things accordignly. The builder tries a few different combinations, and checks if the resulting pattern would be the same as you already have in your connector. If it can not find a suitable set of highlights, it will display a huge warning, and you have two options*
- Keep your pattern. Since it is too complex for the designer, the whole designer will be disabled. From now on, you will have to edit it in the edit tab.
- Accept the pattern. It can happen that that designer comes up with an equivalent pattern, although slightly different. Then it may make more sense to accept the new pattern, and continue working on the designer.
The designer is most likely to run into problems if your pattern uses advanced features like alternatives and or-bags, and especially if you happen to open a different web page.
The flag to disable the designer is available in the options tab, so you can disable it manually too, or re-enable it if you regret your decision.
This starting process happens not only when you open an existing connector, but also if you edit the connector in the edit tab, revert to an older one in the history tab, etc.
(This dialog appeared in version 2.26.2)
Optimizing your XPattern
The XPattern step displays performance numbers in several places. These look like this: 23 hits 58p (150 nodes (75 starts) of 600 =0.25). This means that
- The pattern found 23 hits
- These added up to 58 pieces of text collected into variables
- It had to look at 150 nodes while doing this
- 75 of those were at the start of the pattern
- There are 600 nodes on the page (actually, within the hit area)
- The ratio of nodes looked at to total nodes is 0.25
Obviously, the more nodes the pattern matcher has to look at, the slower it gets. If you notice a small change in the pattern suddenly making these numbers larger, you have stumbled upon an iffective XPattern. Maybe you can write it in a different way. Perhaps using the non-greedy repeat *? instead of the normal *.
If the number of start nodes is too large, you can try to set up a smaller hit area. Then the pattern matcher will not have to bother matching nodes you know will not yield any hits.
Generally, the smaller all these numbers are, the better.
These performance numbers appeared in version 2.30
History tab
The history tab shows past versions of the XPattern.
Next to each version there are two buttons: "Try" and "Revert".
The "Try" button tries to execute the XPattern. If successfull, it highlights the hits on the page and changes the button label to something like "10 hits 30p", indicating that the XPattern found ten hits, and a total of 30 pieces of text.
If the pattern is bad, the "Try" button changes its label to "Error", and if you hold your mouse over it, you can see the error message.
The "Revert" picks that version of the XPattern as the current version, moving other versions down the history.
Edit tab
Should the need arise, a connector's XPattern string can also be edited manually in the "Edit" tab.
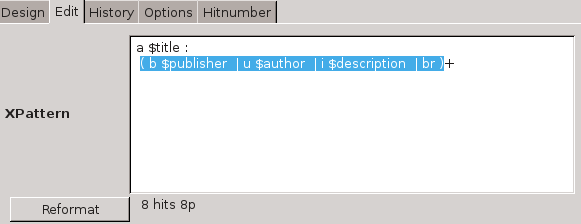
The syntax of the XPattern is checked continuously when editing, and if there is an error, the edit box turns red and a message is displayed under the edit box, for example "2:9 Expected variable". The numbers in the beginning are the line number and position on the line where the error was detected (not always where the actual error is, but where the code could no longer parse the XPattern.) When there is no error, the same space is used for displaying how many hits and pieces the pattern matches. This can be a useful indicator of the effects of your changes, especially if you had to turn off the highlighting, or the page is too large to see all highlights easily.
Double-clicking on a tag name in the editor window will highlight that tag (including all the attributes, and tags insdide this one. It also highlights the matching part on the screen, when the code can figure that out. This is handy for selecting elements for reformatting.
The reformat button formats the XPattern in the edit window. Either to a compact one-line format, or with every tag on its own line, properly indented. If you select some part of the XPattern, that part only will be formatted. For example, if you have a sequence of complex subpatterns (say, TR's that contain the actual fields), you can first reformat the whole pattern into single tags, then double-click on the TR's and reformat each of them into a more compact form.
Double-clicking on an opening braket (of any kind) selects the text until the matching closing bracket. Useful for seeing which groups or alternatives belong together, etc.
Options tab
This tab is for configuring some options that affect the parse_xpattern step.

"Area where the hits are found". This specifies the part of the page where XPattern will be looking for the hits. For normal HTML pages, the default "/html/body" is usually sufficient. For XML pages, you probably need to specify a node that contains all the hits.
"Highlight hits on the page". Tells the builder to highlight hits on the page while things are changed. This is usually very good, but can occasionally get in the way, for example if the page itself does clever highlighting that you need to capture. With really complex patterns and pages, it can also take some time to recalculate the highlight all the time.
"Autogenerate the pattern when changing anything in the designer". When changing many things in the designer, you may not always care to see how the pattern is changed at every step. Especially on complex pages and complex patterns, where this may take a bit of time.
"Disable the designer tab". Since some patterns are too complex for the designer, it can be disabled here.
"Where to put the results" should be obvious. Normally the default, .output.results, iswhatyouwant.Whenworkingwithfacetsinthesearchtask, .output.facets is a good bet. The usual selection is to replace the output, but it is also possible to append to it. If you have several XPattern steps in the task, the later ones should probably use append, not to loose what the earlier steps found.
"Fail if no hits" should be even more obvious. If this is checked, as is the default, and if indeed no hits were found, the step fails. Otherwise it happily returns no hits. (This was introduced in version 2.25.1)
Hit number tab
The "Hitnumber check" is a little tool to make sure your XPattern is not missing any hits.
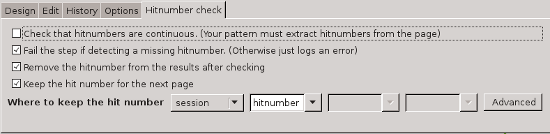
Many sites tend to display a number next to each hit. If that is extracted into $hitnumber, this tool can check that we get a continuous sequence of those, that we don't skip a hit because of different formatting etc.
Configuration
The configuration of the hitnumber check is on its own tab, and consists of a number of checkboxes.
- Check hitnumbers. Enables the hitnumber check.
- Generate missing hitnumbers. If a record has no hitnumber at all, this will assign one. Otherwise a missing hitnumber triggers an error or a warning
- Fail if skips. If detecting a skipped hitnumber, or a record with no hitnumber at all, fail the step. If not selected, the step will only display a warning.
- Remove hitnumbers. After checking them, remove the hitnumber from the record.
- Keep the hit number for the next page. If selected, remembers the hitnumber in $session.hitnumber. Next time the parse task is run, continues the checking from that number.
There is also a place where you can specify the session variable where to keep the hit number for the next page. This defaults to .session.hitnumber.Youcanassignanumbertothis.variable before invoking the parse_by_xpattern step, if you know that the hits should start at a given number.
Regrettably, the name of the hitnumber field is hard coded to $hitnumber. This may well change in some future version.
Templates
The search template
The step API
A step is a Javascript code module stored under its own directory in builder/modules/steps that implements the Step class defined in builder/modules/runtime/Step.js. Here are some of the methods you will need to define:
Core methods
init(task)
Called when the step instance is first loaded.
draw(surface)
Called by the builder to populate the configuration pane for the step.
run(task)
Executes the step instance.
getUsedArgs()
Returns the keys from the argument hash that the step instance is configured to use. By calling these on all steps in a task a list of arguments used can be generated to aid in selecting which task instance best fits a given query.
Metadata
The builder interrogates steps to find out some basic information.
getClassName() - exact name of step class
getDisplayName() - name to display as in the add step list
getDescription() - description for the add step list
getVersion() - step version
renderArgs() - brief representation of conf[] for that instance
Utility methods
upgrade(conf version, current version, conf array)
Enables changes to the step's conf data structure between versions. When a step is loaded this method is called to migrate the data to the new format (if necessary). If it returns true, the instance is now considered to be at the current version.
When upgrade is called with a conf array that is newer than the current version, it should return false as the older upgrade() method will not know if it is compatible and the system will have to fall back on the heuristic that the conf array is compatible if it came from a step instance of the same major version.
unitTest()
A simple function to test the internal workings of the step. Should return a boolean. Can be invoked from the cfrun with the -u option. It takes the path of the js file as an argument, as in cfrun -u steps/delay
File formats
Object serialization
While we have chosen to use XML for connectors and templates in order to best interoperate with our XML-based toolchain, these objects are primarily manipulated with Javascript.
At times we'll want to deal with an arbitrary Javascript structure as one might represent in JSON. For our serialization, we use something akin to the mapping in Microsoft .NET. All values have a type attribute which can be one of array, boolean, number, object, string. Object property names become the element names of child elements of the object. Elements with type="array" have <item> elements as children. An example:
JSON
{
  "somekey": 2,
  "nest": {
    "text": "blablabla"
  },
  "falsy": false,
  "camelCase": [
    "this",
    "that"
   ]
}
XML
<whateveryouwant type="object">
  <somekey type="number">2</somekey>
  <nest type="object">
    <text type="string">blablabla</text>
  </nest>
  <falsy type="boolean">false</false>
  <camelCase type="array">
    <item type="string">this</item>
    <item type="string">that</item>
  </camelCase>
</whateveryouwant>
Connector
The XML format for connectors is kept as simple as possible: no namespaces are used, for example. The format is as follows:
The top-level element is
connectorThe
connectorcontains an optionalmetaDatablock, zero or morepropertyelements and one or moretasks.The
metaDatablock, if present contains information about the connector. It carries no attributes and contains zero or moremetaelements.Each
metaelement carriesnameandcontentattributes, representing a name/value pair, and is otherwise empty.Each
propertycarriestypeandnameattributes, and contains its value: at present, this is always text, but in principle it could be any XML.Each
taskcarries anameattribute, which is set toinit,search,parseornext, and contains zero or more steps and zero or more tests.Each
stepcarries anameattribute (which should be calledtypeas it specifies the type of the step), aversionattribute (which states which version of the step code was in use when the connector was saved, and therefore the format of step-specific configuration), and an optionalaltatrribute, which if present must be sent toyes(and not, for some reason,true).The
stepelement may contain any XML as necessary to contain the step-specific configuration: its interpretation is guided by thenameattribute, which is like the type member of a discriminated union.Each
testcarries anameattribute, and contains zero or moreargelements and zero or moreassertelements.Each
argcarriesnameandvalueattributes, representing a name/value pair, and is otherwise empty. (It is suspiciously similar to themetaelement, in fact.)Each
assertcarriespathandvalueattributes, representing the asssertion that after running the containing task wit the specified arguments, the part of the result structure specified by the path matches the regular expression that is the value.
Example
The following XML represents the most recent version of the connector for the Library of Congress's online bibliographic catalogue.
<connector>
<metaData>
<meta name="title" content="Library of Congress"/>
<meta name="author" content="Index Data ApS"/>
<meta name="date" content=""/>
<meta name="note" content=""/>
<meta name="url" content=""/>
</metaData>
<task name="search">
<step name="nav_to" version="0.3">
<stepConf type="object">
<url type="string">http://catalog.loc.gov/cgi-bin/Pwebrecon.cgi?DB=local&PAGE=First</url>
</stepConf>
</step>
<step name="set_value" version="0.4">
<stepConf type="object">
<dest type="object">
<xpath type="string">//input[@name="Search_Arg"]</xpath>
<frames type="array"/>
</dest>
<param type="string">keyword</param>
</stepConf>
</step>
<step name="click" version="0.2">
<stepConf type="object">
<target type="string">//td[2]/div/input[2]</target>
<wait type="bool">true</wait>
</stepConf>
</step>
<step name="regex_extract" version="0.1">
<stepConf type="object">
<regex type="string">.* of ([0-9]+)</regex>
<matchNum type="string">1</matchNum>
<node type="object">
<xpath type="string">/html/body/div[@class="you-searched"]/table/tbody/tr[3]/td</xpath>
<frames type="array"/>
</node>
<sourceAttribute type="string">textContent</sourceAttribute>
<attributes type="array">
<item type="string">align</item>
<item type="string">style</item>
</attributes>
<result type="string">hits</result>
<match_num type="number">0</match_num>
<attr type="string">textContent</attr>
</stepConf>
</step>
<step alt="yes" name="set_result" version="0.1">
<stepConf type="object">
<constant type="string">0</constant>
<result type="string">hits</result>
</stepConf>
</step>
<test name="Default">
<arg name="keyword" value="water"/>
</test>
</task>
<task name="init">
<step name="nav_to" version="0.3">
<stepConf type="object">
<url type="string">http://catalog.loc.gov/</url>
</stepConf>
</step>
<test name="Default"/>
</task>
<task name="next">
<step name="click" version="0.2">
<stepConf type="object">
<target type="object">
<xpath type="string">//form/div/table/tbody/tr/td/a/img[@alt="Next Screen or Record"]</xpath>
</target>
<wait type="bool">true</wait>
</stepConf>
</step>
<test name="Default"/>
</task>
<task name="parse">
<step name="parse_xpattern" version="0.1">
<stepConf type="object">
<xpattern type="string">TD { INPUT : A [@href $url] } : TD { IMG } : TD $author :
TD { A $title} : TD $date</xpattern>
<hitarea type="object">
<xpath type="string">/html/body/form/table[2]</xpath>
<frames type="array"/>
</hitarea>
<xpatternhistory type="array">
<item type="string">TD { INPUT : A [@href $url] } : TD { IMG } : TD $author :
TD { A $title} : TD $date</item>
</xpatternhistory>
</stepConf>
</step>
<test name="Default"/>
</task>
</connector>Relax-NG Compact schema
The format of connector XML is formally constrained by the following schema, expressed in the efficient and readable Relax-NG Compact format. This schema is also available in Relax-NG XML format and in the horrible, bloated, impenetrable W3C XML Schema language if you insist.
Careful readers will note that the textual description of the XML format at the top of this page is pretty much identical with the Relax-NG schema down here. We should make a tool that automatically generates prose from the schema. But I didn't.
start = element connector {
    element metaData { meta* }?,
    property*,
    task+
}

meta = element meta {
    attribute name { text },
    attribute content { text }
}

property = element property {
    attribute type { "bool" },
    attribute name { text },
    text
}

task = element task {
    attribute name { text },
    step*,
    test*
}

step = element step {
    attribute name { text },
    attribute version { text },
    attribute alt { "yes" }?,
    element stepConf {
        attribute type { "object" },
        ANY
    }
}

test = element test {
    attribute name { text },
    element arg {
        attribute name { text },
        attribute value { text }
    }*,
    element assert {
        attribute path { text },
        attribute value { text }
    }*
}


# This macro is stolen from trang's output when fed a DTD with ANY.
# It's not ideal because it's unlikely that trang can recognise the
# idiom and give the appropriate translation back into DTD or XML
# Schema, but it works
ANY = (element * { attribute * { text }*, ANY } | text)*
Connector Template
Defaults
The <defaults> element currently only contains <step> elements but may later contain other overrides for builder defaults. Can be specified per-task at the task template level or at the top level to apply connector-wide.
Step
Each <step> element has a name attribute containing the step name (like the directory name ie. with underscores). It and its children use the typical XML serialization to store data about step defaults. While each step may have different data, every step uses a conf object and this can be pre-filled by storing it here. For example, changing the default target for the Constant step to $.output/hits:
<defaults>
  <step name="set_result" type="object">
    <conf type="object">
      <jsonPath type="object">
        <path type="string">$.output</path>
        <key type="string">hits</key>
      </jsonPath>
    </conf>
  </step>
</defaults>
You don't need to define everything here as you would for a complete step configuration in the connector. It's applied before the step draws in the builder but after it's created so we still have the initial step config to start from. Any properties there are overwritten with any defaults in the connector template. In turn, any defaults in the task's template override those.
Session file
The session files are created by the proxy-url step and used by the cproxy to reestablish the authentication, cookies, and other session stuff needed by the site before it can serve actual data. The file is simple line-based format, each line starts with a keyword, followed by one or more values. There can be comment lines, those start with a hash '#' and are ignored.
The keywords are listed below. See the proxy-url step documentation for further explanation of what these mean. It is also possible to configure the proxy-url step to add custom lines to the session file. These can contain almost anything. The cproxy will ignore lines it does not understand (with a warning in the log). This feature is intended to be used in situations where we need to use an older version of the engine or a builder, but can have a newer version of the cproxy, which may support some newly introduced features.
- CfSession (d): Gives the session number. This is also implicit from the file name.
- CfVersion (d): Version of the cf engine that produced the session file.
- CfConnector (d): Name of the connector that created the session file.
- CfStep (d) [ProxyUrl] [Version] Task The name and version of the step that created the session file, and in which task it happened.
- Referer (X): The Referer-header to be added to the HTTP request. In normal cases, the users browser sends a Referer-header, which gets used. This setting is only used in exceptional cases, when the users browser did not send any. For example, if the user pastes a URL from a result into a browser.
- BaseUrl (X): The URL of the results page that contained (some of) the links the user may click on. This is used for determining when to send basic HTTP Authentication headers.
- Username (X)(i): User name to use in basic HTTP Authentication
- Password (X)(i): Password to use in basic HTTP Authentication
- Proxyip (X)(i): HTTP proxy IP to use in all requests.
- CookieDomainExpansion (+): [domain] [expansions...] If the domain matches, set-cookie headers are expanded to also cover the domains in the expansions.
- OmitCookie (+): [method] [domain] [cookiename...] List of cookies to omit from the HTTP requests
- Custom-Replacement (+): List of regular expression replacements to
- Basicauthwith (+): Controls the use of HTTP Basic Authentication.
Notes:
- (d): The line is not really used, but is there for debugging purposes and future expansions.
- (X): The line can be omitted by configuring the proxy-url step.
- (i): The line will be omitted, if such argument was not passed to the connector
- (+): This line can repeat, with different values as configured for the step. In most cases these are not needed at all!
If the connector is passed the 'nocproxy' parameter, it will skip the whole proxy-url step.